Friday, December 29, 2023

Ribbon Candy Colored

This dress has reminded me that I need more plaid in my life.

Sure, it's a bit of a bother to work with, but the finished garment sure looks nice and festive!  And really, once everything is cut out, it's not too much of a pain so long as the fabric isn't super drapey.

I am still slightly grumpy about not having enough yardage to match every stripe (as much as that is possible), but looking at the photos, it really isn't hugely obvious unless you know what to look for.  And honestly, this dress looks quite good in comparison to most stripe/plaid matching that I see in mass manufactured garments.  Why are we so hard on ourselves when, with very few exceptions, something hand made is so far superior to something purchased in a store?!

And I am supremely pleased that I finally managed to make this fabric into a shirtdress.  I only wish every fabric was so clear about what it wanted to be.

Or perhaps what I really want is the time and focus to make every project that pops into my head without getting distracted by the next new shiny thing, be it a pattern or a length of fabric.

But then I remember an old pattern that I have made before, and I feel slightly guilty for ignoring the pile of new patterns waiting their turn.

I am currently in a place where I just finished one garment and am looking for the next project to dive into.  There is that black wool skirt that would be an excellent basic to add to the wardrobe and would pair well with dozens of things, or do I make another floral printed dress?  Or will I actually manage to get a coat made this Winter?  Sometimes too many choices can be overwhelming.  

Turns out, the lining that I thought I would have to purchase for the black skirt is unnecessary because I just found another length of black lining stashed with my interfacing.  Why did I put it there?  Unclear.  But it does mean that I already have everything that I need to make that skirt . . . so that may be my answer.

Or is it time to dive into a really complicated project?  Because I could use that kind of distraction . . . then again, that black wool is beckoning . . . or perhaps I should work on that sweater (Tino would certainly appreciate the lap time that comes with that choice).  And that may be the answer, right there!


Dress:  Made by me, McCalls 4769
Belt:  Banana Republic
Shoes:  Kate Spade

Monday, December 25, 2023

A Comedy of Errors

This dress doesn't look too complicated, and quite frankly, it shouldn't have been . . . but a combination of being distracted and rather crabby over the last few weeks created an environment in which quite a few silly mistakes were made that meant that I had to do some creative work arounds.

Vogue 1965 is a recent vintage reproduction release, and I was rather interested in the back view of that gown.  Of course, I have no need for a floor length sleeveless formal at the moment, but I thought I could add a bit of drama to the shorter version.

And somewhere along the way, I decided that it would make a nice Christmas frock.  I wanted the shorter skirt, but I did love that drape back and the scooped out neckline, so I was going to swap those pieces in.  Of course, all of this was dependent on having enough yardage, and I was cutting it close with this cut.

I stabilized the neckline with seam binding.  This may not have been necessary, but I didn't want the back neckline to stretch out, and this will keep that from happening.

I ended up lining the bodice with a cotton voile remnant that I found stashed away.  This makes is easy to trim away that princess seamline without hesitation since it's going to be covered with a lining.

The facing was interfaced and the edge finished with my standard seam binding.

And for whatever reason, the instructions suggest finishing the sleeve hem prior to installing the lined sleeves in the garment.  So I went with it.

So far, so good.

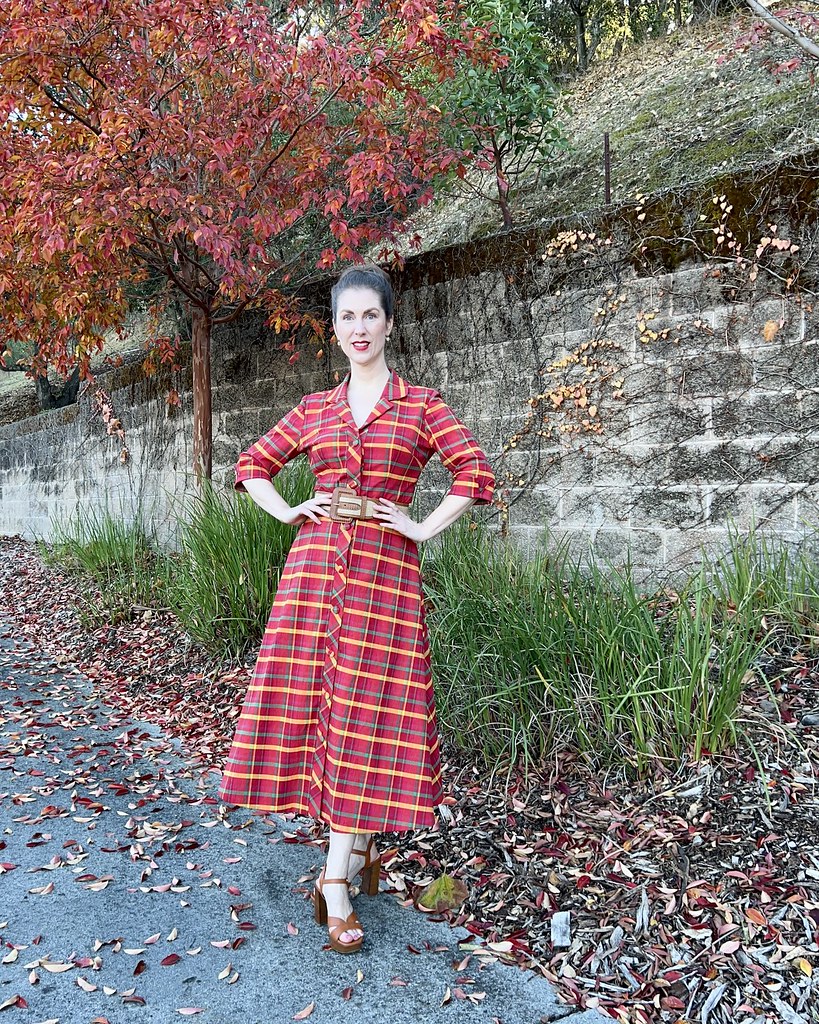
It's giving a very classic 1960s shape, and I'm not mad about it.

Because I was expecting to wear some kind of tights with this dress, I decided to underline the skirt with a bemberg rayon.  And let me tell you, finding enough black bemberg in the stash was a challenge.  I have quite a few scraps, but these skirt pieces took a bit of a creative layout to fit.  Which begs the question - why am I keeping all of those small scrap pieces?!

Part of the problem is that extra length from the waist to under the bust - I am used to cutting knee length skirts that sit at the waist.

And then came my biggest mistake.  [The first was that I actually had to draft a back facing for this garment since the scooped back goes with the sleeveless version that is self-lined and doesn't have a facing . . . but I wasn't paying attention and cut out the given facing which obviously wasn't going to work.  And there went more of my scarce fabric.]  But I was rather determined to add that back drape.  I would have been fine if I didn't start cutting out that drape using the foldline as a grainline.  In my defense, the foldline for this piece is a multi-sized edge, which is not very common in Vogue patterns.  Then again, I should know better.  I stopped cutting as soon as I realized my mistake, but the damage was done - that large pattern piece was never going to fit on my meager remaining fabric.

But the main reason for my pattern choice was that lovely pseudo-Watteau-backed 1960s design, and I was pretty cranky about making another mistake with this dress.  Readjusting the pattern piece left me with quite a bit of fabric missing from the lower edge; too much to get folded up in to a hemline.

But I did plan to use some leftover red velveteen for the under-bust contrast, and it struck me that the same contrast might work on that lower edge of the drape.

Unfortunately, there was significantly less of the velveteen than I remembered having . . . but a center seam solved that problem. 

It wasn't perfect, but it might just save that back drape.

The piece gets folded, stitched down to the underlining, and attached at the lower bodice/upper skirt seam.

The red contrast on the drape is wider than the band on the bodice, but I was hoping that the proportions would work (it had to be wide enough to cover the cutting mistake, but still fit on the velveteen scraps, and I was hoping for the best).

The design calls for a side zipper, which I applied by hand with a lapped application.

And as long as there are no other crazy mistakes, this looks like it's coming together.

I was still uncertain about that back contrast at this point, but I was pretty sure that after I added the contrast band to the bodice, this would look much more balanced.

Because it's just so much more interesting with that extra skirt piece back there!

To keep the underlining layer in place along the hemline, I ran a line of stitches just inside the fold - this keeps the two different fabrics from separating.  It also gives me an easy mark to follow for the actual hemline.

According to the instructions, the bottom of the panel is hemmed, and the sides just fold into place over that finished hem.

Most contemporary patterns would have the contrast band stitched right into the under bust seamline, but the original vintage instructions have the bias strip finished before hand stitching it along the seam.

This is helpful to eliminate some of the bulk that would otherwise be stuck in the zipper opening.  I definitely prefer this manner of adding a contrast belt and bow.

It all means that you can choose the exact placement exclusive of the seamline; if you want the band to cheat slightly higher or lower, you can do that with this technique.  That won't work if the raw edges are already enclosed within the seam.

For the skirt hem, I used some seam binding, per usual.

And for the finish at the contrast band, I did something a bit different than the instructions.  They would have the contrast hand stitched along both short ends.  But with such an obvious contrast, that would mean that the zipper would break up that line.  Instead, I added some length to the bias piece and had the excess overhang the front bodice.  This flap then gets snapped into place on the back bodice once the zipper has been closed.

And that seamline right in the center the red velveteen was still bothering me . . . so I scraped together the remaining scraps and made myself a bow to slap right over that aggravating seam.  It's a lot, but this is a holiday dress, so I'm just going for it.

Do I still prefer a fluffy petticoated skirt?  Yes.  I probably always will.  But every once in a while, it's good to switch things up a bit.

And yes, that double bow is rather silly.  But I had velveteen scraps that are a lot more fun to have on this dress than folded up in a remnant bin.  I can't actually believe that I managed to get a second bow out of the bits - it's almost as though it was meant to be.

That's another Christmas themed novelty printed dress for the collection.  It won't get worn this year, but there's always next December.

And if I ever have the need for a floor length 1960s inspired gown, I know where to start.

Perhaps I will even add velveteen to next year's possible holiday textile choice . . . if I think I have the patience.  Because it's not half as terrible as working with silk velvet!


Thursday, December 14, 2023

A Christmas Plaid

This fabric is from a fabric swap that happened in Fall of 2022.  It was seasonly appropriate when I picked it out, and I had immediate plans for a shirtdress.  But, as with so many of my project ideas, some other sewing project distracted me, and once the weather got cold, I lost the motivation to work with the fabric.

Fast forward a year, and once again, cold weather was approaching, but I really wanted to use this fabric.  So I went rummaging through my patterns searching for something appropriate  - which is when I remembered McCalls 4769.  I made this up in a black rayon/linen blend about 15 years ago, and I remembered it being a great pattern.  The only issue was that I really wanted a tea-length dress, and my fabric was four yards, however, it was only 45" wide, so fitting all of the pieces and getting a decent plaid match was going to be challenging, if not impossible.  But once I get an idea stuck in my head, I'm pretty stubborn, and I wasn't going to let this go.

For whatever reason, this fabric just felt like it was meant to be a shirtdress from the moment that I spotted it, and that was the only silhouette that would do.

One of the reasons that I picked this particular pattern was for that bias cut banding that runs down the center front of the dress.  I thought that it would be a nice break in the plaid (although it doesn't eliminate the need to match up those horizontal lines).

One quirky feature of this pattern is the three-quarter cuffed sleeve.  I have never come across another pattern (vintage or contemporary) that uses this method of cutting one long sleeve piece and creating a notched cuff by folding and stitching what amounts to a dart in the middle of that fold.

I posted the process on Instagram, and from the response, it looks as though no one else has seen this technique before, either!

After fighting to fit all of my pieces with less yardage than the amount required, things went together fairly easily.  Well, there was that hiccup with the collar when I clipped one side at the notch instead of the marking for the clip, but I managed to get through that after a bit of cursing.  Don't start sewing when you are distracted by other things!  When will I learn?!

And speaking of plaid matching, it seemed to me that the yellow stripe was going to draw the most attention, and so I did my best to focus on that part of the plaid.

As you can see here, the bodice and back skirt look pretty good from the horizontal perspective, however there was just no way to get those vertical lines to match and cut a long skirt from the fabric that I had.  If I stare at it long enough, it really bothers me, but I don't have to look at my back when it's on my body, so I am going to enjoy the dress as it is.  And since I plan on wearing a belt, I would wager that most (non-sewing) folks wouldn't even notice the issue.

Seams were finished with seam binding, of course.

This cotton/spandex woven was easy to work with, so there was not any frustration from that perspective.  And at least I managed to get that center back skirt seam to match - because that would have made me truly crazy!

I don't usually trim down my waist seams, but this fabric, for whatever reason, did have a tendency to fray more than expected, and I thought it would be a good idea to give myself a fresh edge for the seam binding application.

Facing pieces were interfaced, as was the bias strip down center front.

And honestly, that's not looking too terrible.

I got lucky with the collar, and the points matched up great on the first go, which is always nice.

And I do love any excuse for a bit of hand sewing!

For my buttonholes, I pulled out a vintage automatic buttonholer made for an old straight stitch machine.

If I have to make machine buttonholes, it's nice to be able to count on that attachment instead of fighting with a modern version.  The Bernina foot with that plastic eye thing is atrocious.  It is so finicky and rarely works properly, so I have given up on it completely.

I broke down and purchased a gross of covered button forms from Wawak in a few different sizes.  It's rather freeing to think that I can cover buttons to my heart's content without worrying that I am going to have to run to the store to get just one more for that placket front.

I also can't figure out why my stash of red buttons is wanting.  Then again, I think the self-fabric buttons really were the best choice with this fabric/design.

And here is one of the ways I cheated my lack of yardage.  The bodice facing had to be cut from self-fabric because of the fold back design, but the lower skirt facing pieces I cut out of a red cotton.  Would I have preferred it to be the plaid?  Yes.  But at least this allowed me to make the dress in the length I envisioned it.

I did shorten the skirt pieces slightly, but then used a narrower than suggested hem, so it all worked out.

Some cotton spandex blends can be difficult to hand stitch; I find that I almost want a ballpoint needle (do they make those for hand sewing?).  But this one was quite lovely to work with.

And to keep that bodice closed (the buttons are not spaced very closely) I added a hook & thread bar at the waist, and a snap between the two bodice buttons.

After wearing the dress for the day, I added another snap between the first two buttons on the skirt.  Since the hips are fairly fitted, I noticed that the interfaced band had a tendency to pop open when seated.

But a single snap took care of that.

Overall, I am very happy with the way this dress turned out.  I might try interfacing the cuffed section of that sleeve with a lightweight fusible if I make this again, but it still looks nice in this fairly crisp textile.

Now if only I had an extra yard I could have made that darn back really match up!  But we don't always get our way, now do we . . .