
I often get questions about the rayon seam binding finish
that I love to use. So when Jeanette
suggested a tutorial, I figured the timing was perfect!
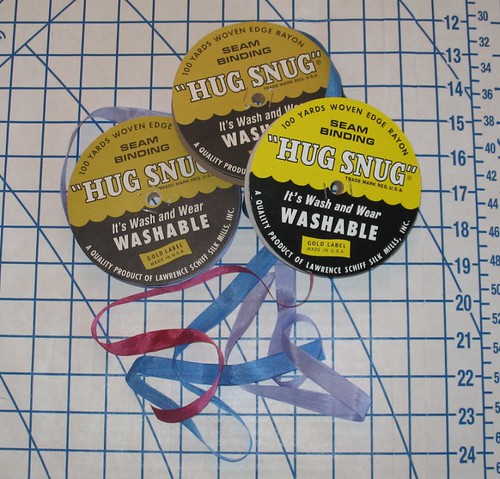
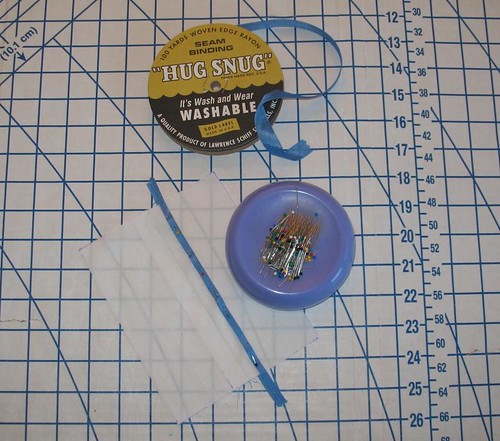
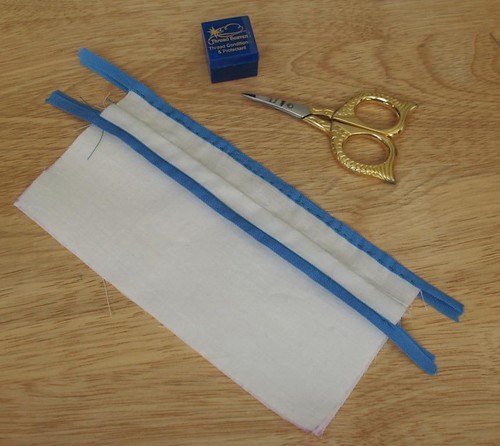
First, you will need to make sure you have the right
materials. I use Hug Snug Rayon Seam
Binding, but any rayon binding will do. This is not twill tape,
polyester hem tape, or single/double fold bias tape. I highly recommend getting your hands on some
rayon binding - it makes a real difference.
Whenever possible, I like to sew my seams before applying the
hem tape to the raw edges of my fabric.
This way, if any stretch occurs, your piecing will not be affected.
There are a few different techniques I have used to apply
the seam binding, and I am sure there are more that I am not aware of, but I
will start with my favorite.
*Double-Seamed Method*

1. Pin and sew your
seam as you normally would.
2. Iron your seam
flat.

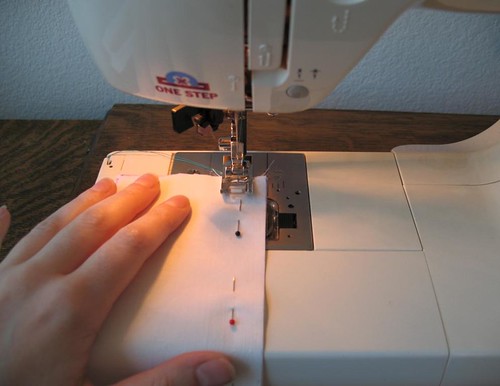
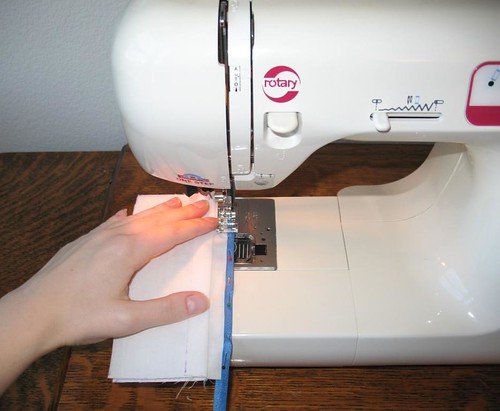
3. Go back to your
sewing machine. Push all of the fabric
to the left of the needle except for one raw edge (you should have the wrong
side of your fabric facing you). I like
to keep a spool of seam binding at my feet and unwind it as needed.

For my first seam, I do not use pins, but you certainly could. The
seam binding is a bit sheer and very delicate, so you should be able to
see/feel where the edge of your material is.
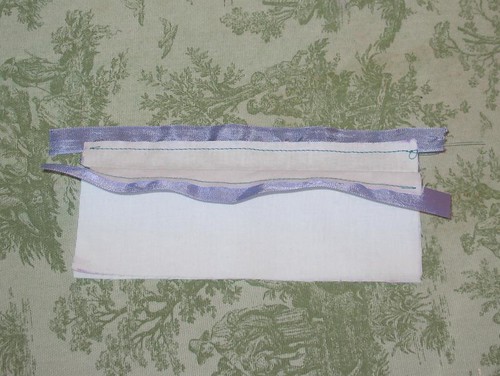
I like to place the binding so a bit more than half of the binding hangs
over the edge (if your fabric if thick, you may want to have even more hang
over the edge to accommodate the thickness).
Stitch this is place and continue unwinding from the spool at your feet
until you reach the end of the fabric.
4. Cut the binding
about an inch from the edge of your fabric just in case it unravels at the cut
end before you finish your garment.

5. Back at the
ironing board, fold the remaining half of the binding so that it encases the raw edge. At this point, depending on the length of the
seam, you may want to use a few pins to hold the folded over edge in
place. You may not need to, however, because this stuff irons beautifully!

6. Now you need to go
back to the sewing machine and stitch that seam in place. I usually complete these first steps on all of
my lengthwise seams at once before heading to the ironing board, iron a bunch
of them down, and then head back to the machine to be more efficient.


This method obviously uses up a lot of thread, but I
find that I get the best results. I do
not have to struggle with a narrow folded piece of drapey rayon and I do not
have to pre-cut lengths of binding, so in the end, I feel like it saves time
and frustration.

But that’s just me!
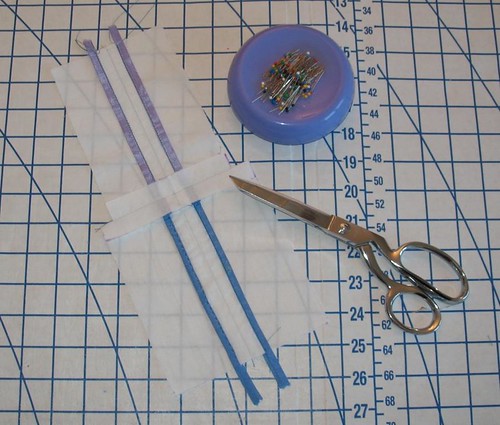
*Pre-Fold Method*
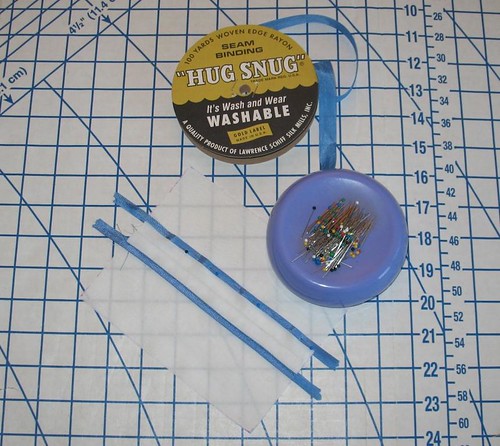
For this method, lengths of seam binding are cut to the
length of each raw edge that needs to be covered. If I go this route, I like to use pinking
shears to cut the binding. (While the
edges are woven and will never ravel, the cut ends have a tendency to fray.)
1. Pin and sew your
seam as you normally would.
2. Iron your seam
flat.
3. Cut your pieces of
seam binding a bit longer than your seam (to account for any measurement mistakes
– you will not want to unpick your stitches once you have completed a long seam,
and it is always better to have a little too much than not enough, right?).

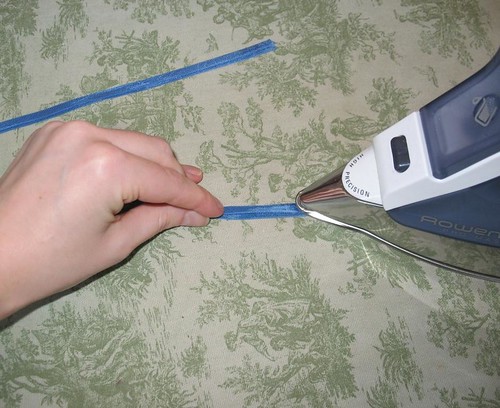
4. Go to the ironing
board and fold the lengths of seam binding so that the edges are not quite even. This will ensure
that your single line of stitching catches both the front and back sides of the
binding.
5. Here comes the
irritating part (at least for me). Forget
I said that – it may end up being you favorite part and I would not want to
influence you! This time you should work with the right side of the fabric facing you. Encase the raw edge of
your fabric with the thinner edge on the top and pin in place.
6. Go back to the sewing machine and stitch as
close to the edge as possible. When you
turn your seam to the wrong side, you should have easily caught the back side
of the binding because it is wider than the front fold.
If your stitches look a bit wavy or the binding looks
ruffled, go back to the ironing board and press your seam flat with a bit of
steam. Presto, you have a beautifully
finished seam edge!
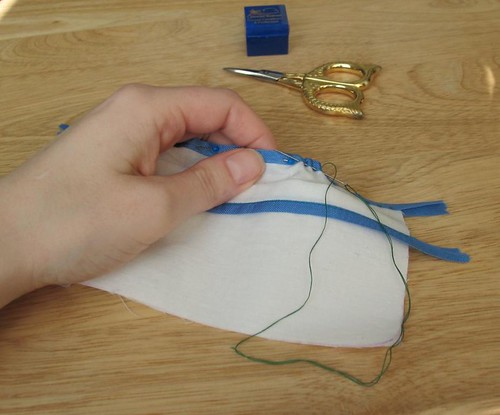
*Pre-Fold Hand Stitched Method*
This method is the same as the pre-fold method except that
you will be hand stitching the seam binding.
I have found that with a piled fabric like velvet or some
thicker wools, the folded rayon does not like to stay in place with the
Pre-fold method and then you have to fight your machine, the stitching line is
no longer straight, and frustration ensues.
I should also confess that I find hand sewing to be incredibly relaxing
(unless you are on a deadline!) and easier to keep things from shifting. I use a combination of a running stitch with
a few backstitches every few inches to make sure that the running stitch does
not gather my seam.
A quick steam press, and you have a lovely finished seam – nothing is ever going
to unravel!
*A few more things to keep in mind*
This is obviously a rather time consuming technique to
finish raw edges, but I believe the end result is worth the extra trouble. The light weight rayon will not add bulk to
your seams, it gives a very vintage feel to the insides of your garments, and it really is pretty!
If you have perpendicular seams, make sure to finish all of the seams traveling in the same direction before sewing up any cross seams. For instance, each lengthwise skirt seam
should be bound before the skirt gets stitched to the bodice along the waist
seam.

This will catch all of the ends of
the seam binding in that waist seam, which, eventually, gets finished with the
binding.

And look, you now have another completed seam that needs to be finished! Time to get to work!
I have never pre-washed the rayon binding, and have never
had an issue with shrinkage. That being
said, I normally drip dry all of my hand made clothing, so I am not sure what
too much dryer time might do to the binding.
I would imagine that if your fabric is pre-shrunk there should not be any
issue.
Rayon seam binding also works great as hem tape!
*Suppliers*
If you don’t think you will have a use for 100 yards of this
stuff, I would suggest Mattiecakes’ etsy shop.
She sells very reasonably priced lengths in stunning colors.
If your local sewing shops do not
carry rayon seam binding, I would suggest trying some Hug Snug from fabric.com. The mass retailers like JoAnn Fabrics
do not carry the rayon binding, and I would suggest avoiding the polyester hem
tape that looks similar at all costs – it is stiff (even though it calls itself “soft &
easy”) and will not iron nearly as well – I would imagine it would melt if your
iron gets too hot!
And I promise you will
get a lot of use out of this stuff – it is fabulous!

Contrasting colors can look very pretty, so don’t worry
if you cannot find an exact match to your fabric.
If you have any other suggestions for places to purchase
rayon seam binding, please let everyone know!
Sorry for the length of this entry and the poor picture
quality – the sun was not very bright in the sewing room today! I have a new found respect for all of the
bloggers out there that are always doing new tutorials – it is really
challenging and time consuming not to mention difficult to take pictures with one hand! So please let me know if I was unclear or need to fill in any missing steps.
Thanks for reading!
Thanks Laura, I will definitely be trying my hand at the rayon seam binding, hopefully sometime soon :)
ReplyDeleteThanks You!! :-) I can't wait to try it. I got some pretty pink from Fabric.com a while ago and think I will use it inside a skirt for starters. Now I just need some time to sew... I can see having fun "collecting" a bunch of the colors just because they are so pretty. lol Off to check out that Etsy store! Thanks again for the tutorial, that really helps alot!!
ReplyDeleteThanks Laura - I have a silk blouse on my "sew it next" list, and I wasn't sure if all the seams could be sewn French, or how exactly to use seam tape. I have a few rolls of vintage tape I got at an estate sale, and now I know how to proceed!
ReplyDeleteAwesome tutorial! When my serger was broken I did nearly all my seams this way, and I admit, I get a greater sense of satisfaction when looking at the inside of those garments :)
ReplyDeleteThanks for putting the time into this great tutorial!
Thanks for this tutorial. I'd never even heard of rayon seam binding.
ReplyDelete--C.B.
Wow! I love binding my seams but have found cotton binding is too stiff and bulky and gets pulled out of shape when I pre-wash it (necessary with cotton). Polyester or poly-cotton binding is also terrible - similarly stiff and bulky and worse - melty! I have therefore tended to make my own from self-fabrics, silk satin or silk organza, but that is an enormous hassle. In short I am THRILLED to learn of the existence of rayon binding - and your application methods look great too. Thanks :) :)
ReplyDeleteGreat tutorial! I've seen Hug Snug around, but I wasn't quite sure how it worked.
ReplyDeleteAlso, I was wondering if you were going to the BurdaStyle Sewing Handbook Launch Party on Monday. I'm going to do my best to be there, and I thought it would be nice to meet other Bay Area sewing bloggers.
@Amy Amy, I just heard about the Launch Party yesterday on the BurdaStyle blog, and thought it sounded like a lot of fun. I am not sure if it will work schedule-wise, but I am going to try to show up for a bit. So perhaps I will see you there!
ReplyDeleteFabulous tutorial - it is just what I needed to know. I am about to start a black velvet recital dress for my Dd, and wondered how I would finish the edges. Perfect timing! Now I just need to learn how to do a hand picked zipper....
ReplyDeleteBlessings,
Patti
Thanks for this; I've had a roll of black hug snug in my sewing stuff for years, but didn't know quite how to use it. Do you use it around the armscye seams for sleeves, or do you do something else there? Seems like it might get a bit tricky getting it on there and having it not be all bunched up or bucked...
ReplyDelete@Holly Gates Holly: I absolutely use it to finish the armscye. To make it easier, I trim the seam allowance down. And I would recommend using the double-seamed method to navigate the curves! It’s not as easy as a straight seam, but definitely works!
ReplyDeleteI love this! I will use this with everything. Thanks for the tutorial.
ReplyDeleteThis is very useful! Thank you!
ReplyDeleteHow well does it work on curved seams? I mean, is the rayon tape cut on the bias?
Thanks again, I've been wanting a tutorial like this for a while now, even though I have a serger on loan to me.
Emilie,
DeleteYou are so very welcome!
The seam binding is not cut on the bias. However, I have had quite a bit of success with curved seams, but it does take an extra bit of fussing to get to it work properly. A good steam under the iron makes all the difference after it is applied.
Great tutorial and pics! Thanks so much. I have done them myself, and I understAnd the work involved.
ReplyDeleteHugs, Joy
Thanks this is really useful - have just been given some of this and have never used it before :)
ReplyDeleteThank you so much for this tutorial! I just picked up some recently because it was on sale, but I wasn't too sure what to do with it. Happy blogiversary!
ReplyDeleteThank you for sharing. I've been wondering how this product was used. How does it behave on curved edges?
ReplyDeleteIt will work on a slight curve, but since the binding is not bias, a circle can be finicky. It does, however, iron beautifully, so with a bit of steam, you can definitely shape a strip.
Deletethank for the tutorials ,that was great
ReplyDeleteThanks so much - very helpful.
ReplyDeleteLooking really nice! I'm the kind of person though that YES! 100 yards please, oh wait, let's make it 200 while we're at it because I don't know if I'm ever gonna find it again. Hmm... but saying it like that.... 100 yards per color please. :)
ReplyDeleteThanks so much for this tutorial Laura Mae.
ReplyDeleteHug Snug was hard to find in England, but I hunted some down- and agree with you that it's fabulous! Just mentioned your tutorial in my latest blog post :)
Thanks for the awesome tutorial! I'm definitely convinced...especially since my next dress is going to be Butterick 5882, which will be deserving of such lovingly finished seams! Now to decide which color Hug Snug to buy...
ReplyDeleteJust wanted to let you know that Hug Snug is available through WAWAK. I usually am able to get it there for under $7 a roll, though you do have to pay for shipping.
ReplyDeleteThank you so much for this! A pattern I will be sewing calls for it, and I have never used it before!
ReplyDeleteInstead of hand sewing binding to velvet fabric raw edges, how about simply serging those pesky ravelly edges? OK, serging certainly does not have the expensive retro look that binding has, but it certainly is quicker and less frustrating.
ReplyDeleteA serged edge is definitely a possibility, but for those of us without that specialized machine, this is an inexpensive and pretty alternative! :)
DeleteAlso other anonymous, serging does not look very nice in comparison and is a waste of thread. And yes they are expensive and unnecessary. I don't want to replicate factory made which are badly made.
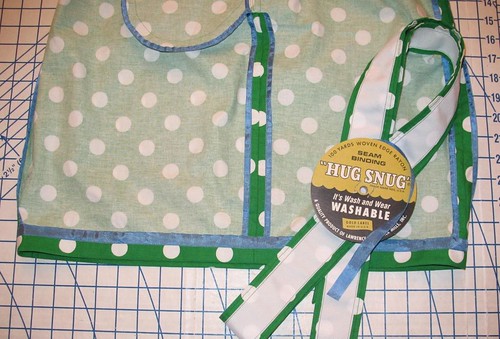
ReplyDeleteThis is probably a silly question, but how would you recommend finishing those edges with rayon binding that will not eventually be finished by another seam? For example, with the fourth picture in this (http://www.lauramaedesigns.com/2014/06/polka-dot-party-time.html) post, how would you go about finishing the corner? Would you just fold the binding under? Thank you!
ReplyDeleteDanielle
Danielle – it really depends on how I am feeling that day!
DeleteSometimes I stop stitching before coming to the corner, sink the needle, crease the binding diagonally (as you would with a mitered corner) lift the presser foot, rotate the piece, and continue along using a single length of binding.
In the picture you refer to, I applied binding to each side, trimmed the edges even with the cotton facing, and then applied another piece of binding to the bottom edge. To finish those raw edges, after applying the first line of stitching to my binding, I folded the ends to the back along the side edge and then folded the binding in half to cover the long edge, which contains all of the raw bits.
So yes, you can absolutely fold raw edges under!
What about using ribbon in the same way? I have some 1/2" silk ribbon on hand that would look lovely inside a dress. Can you think of any reasons why using ribbon wouldn't be a good idea?
ReplyDeleteI think that would be a lovely option! The only thing I would worry about is color bleed if the color of the ribbon is darker than the fabric. Silk often bleeds when washed, which the Hug Snug does not do - you might want to test out with a few scraps. Good luck!
Delete" So please let me know if I was unclear or need to fill in any missing steps."
ReplyDeleteYou did quite well dear Sewist. Thank you for this tutorial. I am pinning and referencing on my blog.
Cheers,
Lyric
Lovely Tutorial! Concise, clear, and to the point!
ReplyDeleteBTW, Hug Snug is available from WAWAK.com, in 38 colors. A ½" x 100yd roll is $7.89, plus tax and shipping.
What a great tutorial! I'm only just getting back into sewing after doing it a bit casually when I was much younger. My grandma had always got upset as I picked it up so easily but am, well, a little lazy… :D This was a good thing to happen upon as 1) I suppose I should probably actually finish seams when I start sewing real stuff as unravelling would be bad… and I just need to start doing this stuff correctly… and 2) I now know a great product to use to do it! (also, I just noticed it's on Amazon too, so I'll add some to my list and note the wawak site so I don't forget about it!)
ReplyDeleteI'm sure someone has already said it, but Wawak is my fav for all notions! They're running low on Hug Snug, but they have an alternative brand, very high quality, slightly over 1/2", and its 100% rayon that's made in the USA!
ReplyDeleteThanks so much for the great tutorial!! I tried using the hug snug a long time ago and it drove me a bit batty. I am sure to give it another try.
ReplyDeleteI will be sewing a dress using sheer fabric and I'm not sure how I'll finish the seam allowances. I think I'll try this. Thanks for the info!
ReplyDeleteI love the hug snug rayon binding! I have 5 basic colors and use it a lot on blouses of late. I have had good results and love having my seams so beautifully finished.
ReplyDeleteThe Etsy vendor listed above is currently not offered any products.
ReplyDeleteI didn't know you could wash rayon! I have a ravelly 100% cotton gauze blouse I am working on now. The fabric has been pre-shrunk. I thought you needed to stay with the same fiber contents throughout, to prevent shrinkage and puckering later?
This is an awesome tutorial, thank you! I've never heard of rayon seam binding, but it's on my "must-have" list now! :-)
ReplyDeleteHi Laura: I am binge-reading your blog. I especially appreciate this tutorial as you have given me a solid technique that I intend to use henceforth. It looks beautiful and professional, a really lovely finish. Thanks for this post, and for the blog! - Bonnie
ReplyDeleteVery neat finish.
ReplyDeleteBut how do you finish waist seams ? Like when you assemble a bodice and a skirt, do you bind the seams open or do you press them together up and bind them at the same time ?
I only used seam binding for shirts and skirts yet but not dresses. I will be making my wedding dress