Showing posts with label Organic Cotton Plus. Show all posts

Thursday, May 19, 2022

A Room with a View

I am finally getting around to posting my outfit that was inspired by the cotton twill that Organic Cotton Plus sent me last year.

I am suddenly becoming reacquainted with my love of Victorian and Edwardian inspired fashions for a variety of reasons.  One of those is perhaps because I am not ready to consider the late 80s/early 90s "vintage" just yet, and there is only so much further forward of 1960s and 70s fashion that I am willing to venture into.

Wearing ankle length skirts is something I need to adjust to, though, especially when I am sitting in an office chair; those rolling wheels are dangerous!

Of course, once I had the skirt idea sorted out, I decided to finally try my hand at using a Folkwear Pattern.

And I am so glad that I did!

This pastoral cotton sateen is also from Organic Cotton Plus, and it's fabulous.  I love the print, and the fabric quality is really wonderful.  It also comes in a white background with the same adorable green print.  I am tempted to get some of the white colorway to make another style of blouse. 

As for this particular blouse pattern, I will definitely be making another, probably in white.  I am always looking for a white blouse to pair with my printed skirts, and while there are a couple of options in my closet, there are not enough as far as I'm concerned.

The other exciting part of this project was the opportunity to wear my Londoner oxfords for the very first time.  And I don't think I own a more comfortable pair of shoes.  I am now convinced that I should specifically look for new sewing projects to match these shoes.  It's not the first time that I have created an outfit around a pair of shoes, but this will mean that I am working with slightly different silhouettes and skirt lengths than is my norm, and I am excited about that prospect.

I have an antique white petticoat stashed away that deserves to get a bit of attention, so perhaps a white cotton blouse would be nice to pair with that.  And maybe I could try my hand at some lace insertion while I'm at it.

Of course, I may be seduced by all of those sundress patterns that I have never made as the temperatures heat up around these parts.

I should also rummage through the stash of lace I have on hand because that might be all the motivation I need to get back to my love of Victorian inspired fashions.

Blouse:  Made by me, "Gibson Girl Blouse" from Folkwear Patterns
Skirt:  Made by me, Butterick 3418
Belt:  Made by me
Earrings:  Vintage
Shoes: "Londoner" by American Duchess


[The fabric for this project was received from Organic Cotton Plus in exchange for writing a blog post.]

Monday, December 13, 2021

Gibson Girl

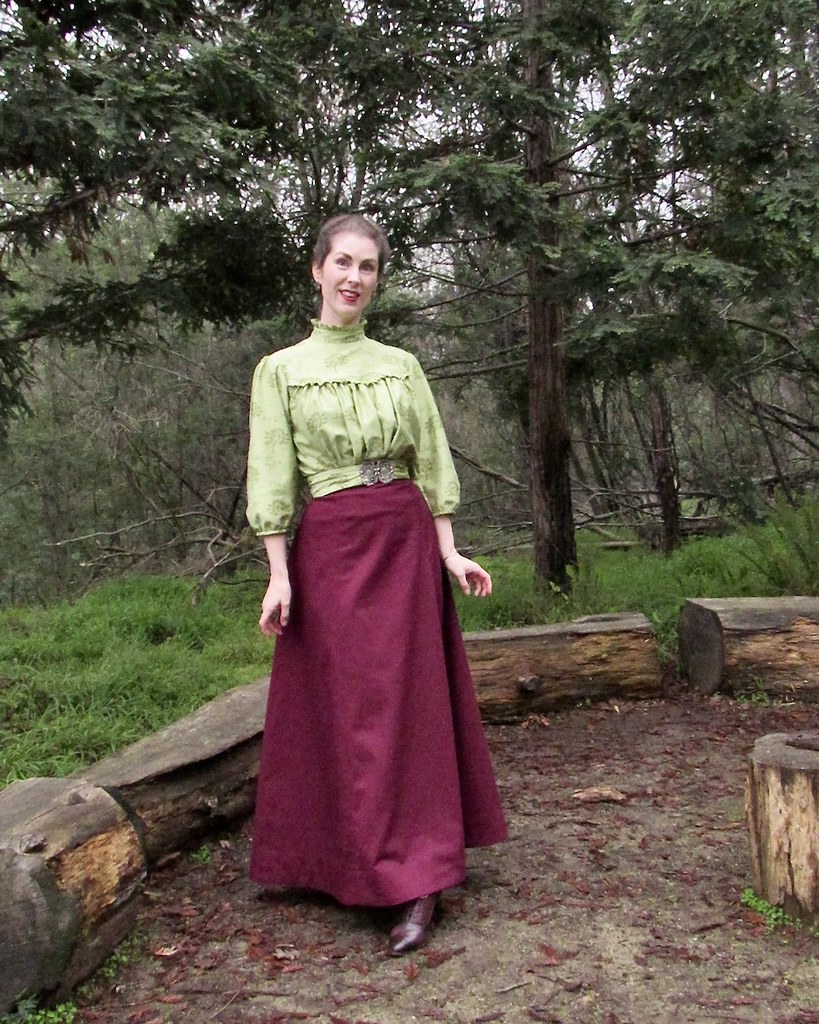
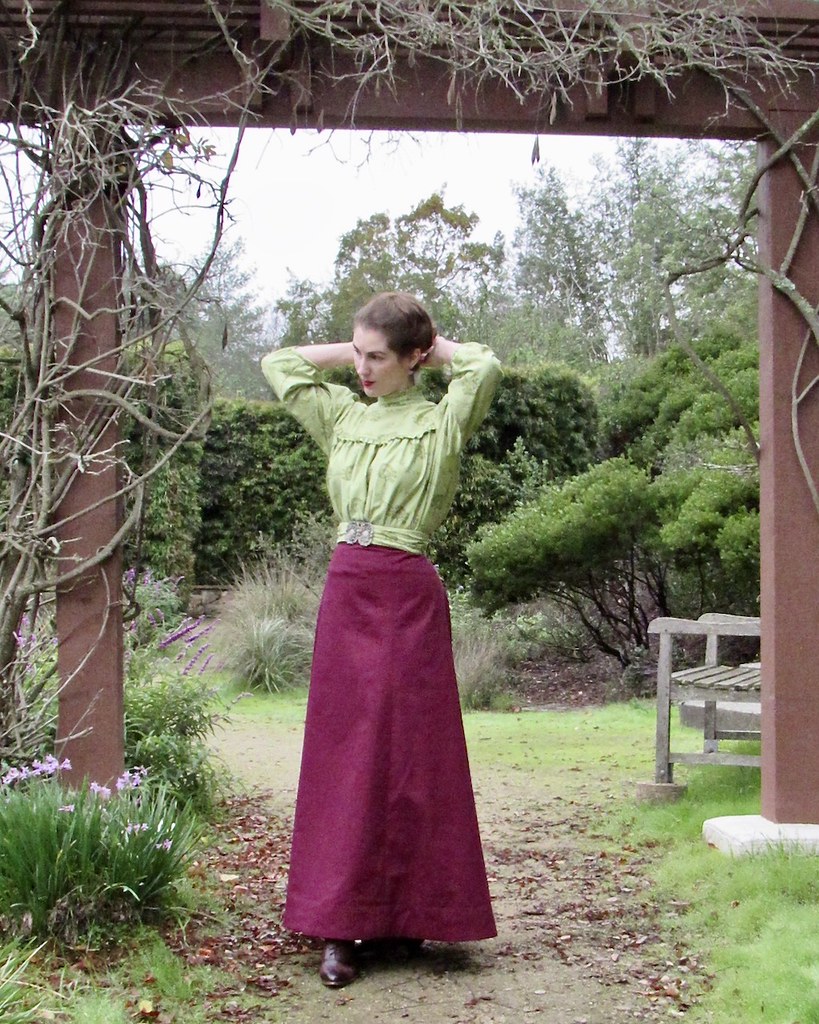
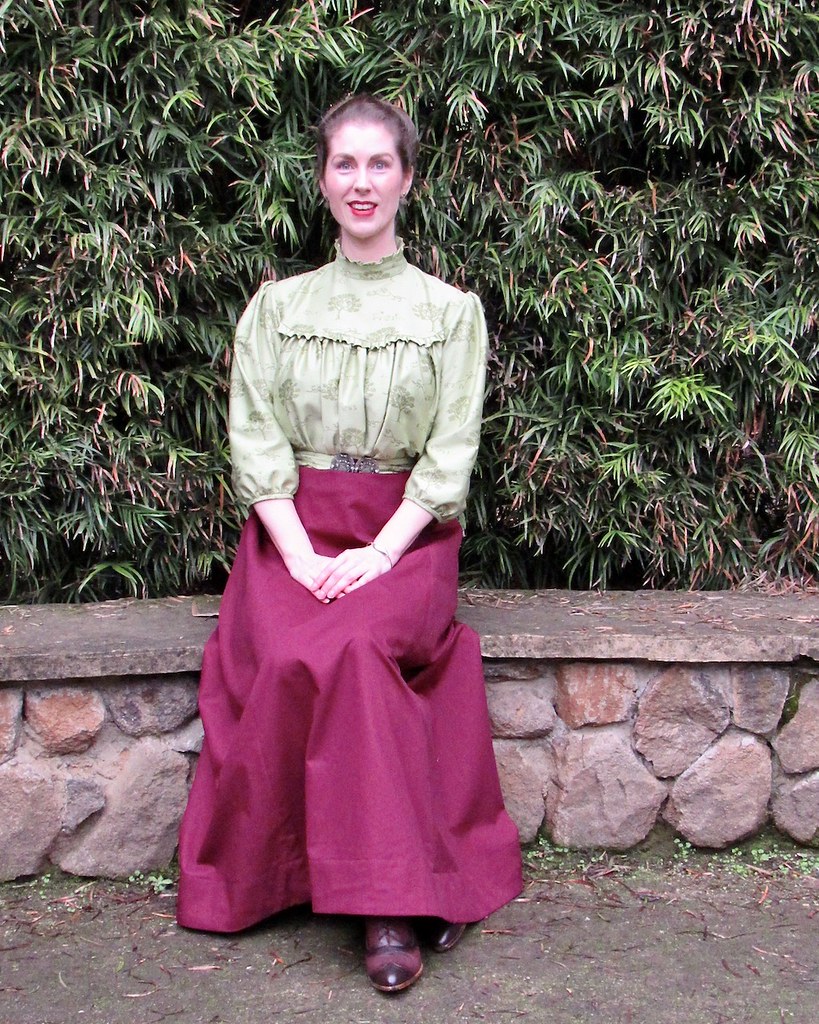
Once I decided to make a Victorian walking skirt, I needed to figure out what to wear with it.  In order to embrace my high school obsession with everything Victorian and Edwardian, I decided I should go all out and find an appropriate blouse to pair with the skirt.  I had a few reproduction patterns on hand, but I have never worked with Folkwear Patterns before, and now seemed like as good a time as any.  

I remember this pattern design vividly.  My very first sewing project using a machine was a costume for a theatre class scene from Sense & Sensibility.  JoAnn Fabrics used to carry Folkwear Patterns, and I remember my two classmates and I wondering if we should choose the Folkwear Pattern or a McCalls pattern.  We had been given strict instructions not to choose something too complicated, so we went with McCalls, but I definitely had my eye on that Empire Dress along with the Edwardian Underthings and this very Gibson Girl Blouse.

I also never realized that the company was local, but there it is, right on the pattern envelope:  San Rafael, CA.  This probably explains why a local JoAnn Fabrics was carrying the patterns back in the late 90s.

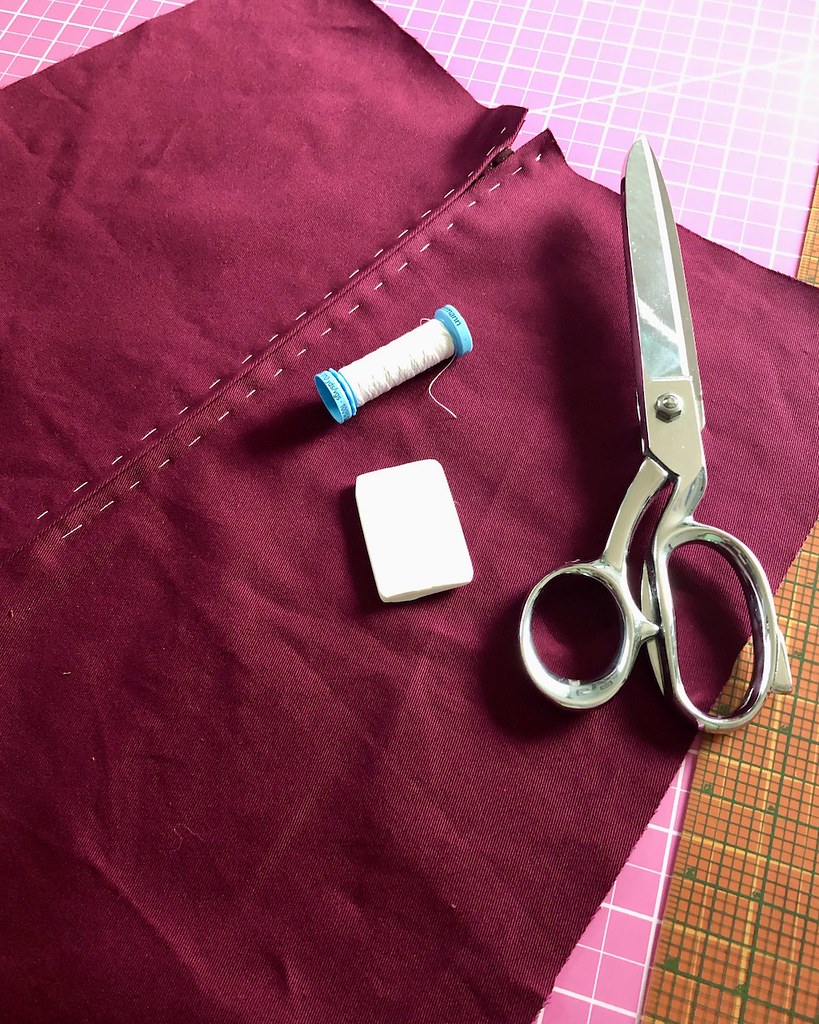
Since I was using Organic Cotton Plus cotton twill for the skirt, it seemed fitting to find an appropriate fabric for the blouse from the same website.  After trying to narrow down way too many cute cotton prints, I decided to go with a cotton sateen.  I used their cotton sateen to make this dress years ago, and it is really lovely to work with.  Already knowing that it drapes very nicely, I though it was a better bet to take than a quilting cotton that might end up a little too stiff for the voluminous blouse pattern.

I went with French seams for most of the construction.  I think that using seam binding on a single layer of this fabric was going to be too much, so an enclosed seam was the option I chose.

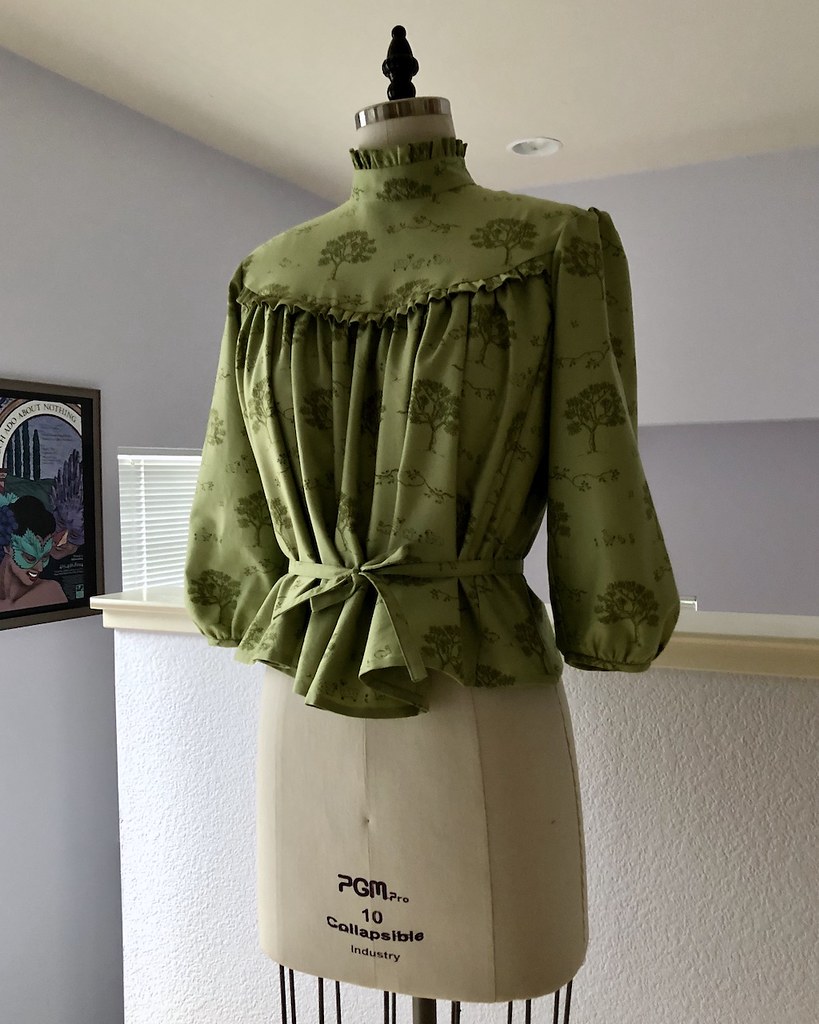
And while I would love to play with lace insertion at some point, this was not the right fabric.  There was no way I was going to find a matching lace, at any rate.  But I do love the lace details on this design along the yoke and collar.  The obvious solution was to make my own ruffle by folding bias strips in half and gathering them.  

I ended up cutting each ruffle 1.5X the length of the seam.  This seemed like a good proportion, and it turned out well; it's not too much, but the gathers look intentional.  I think two times the length would have been too much for this application.  

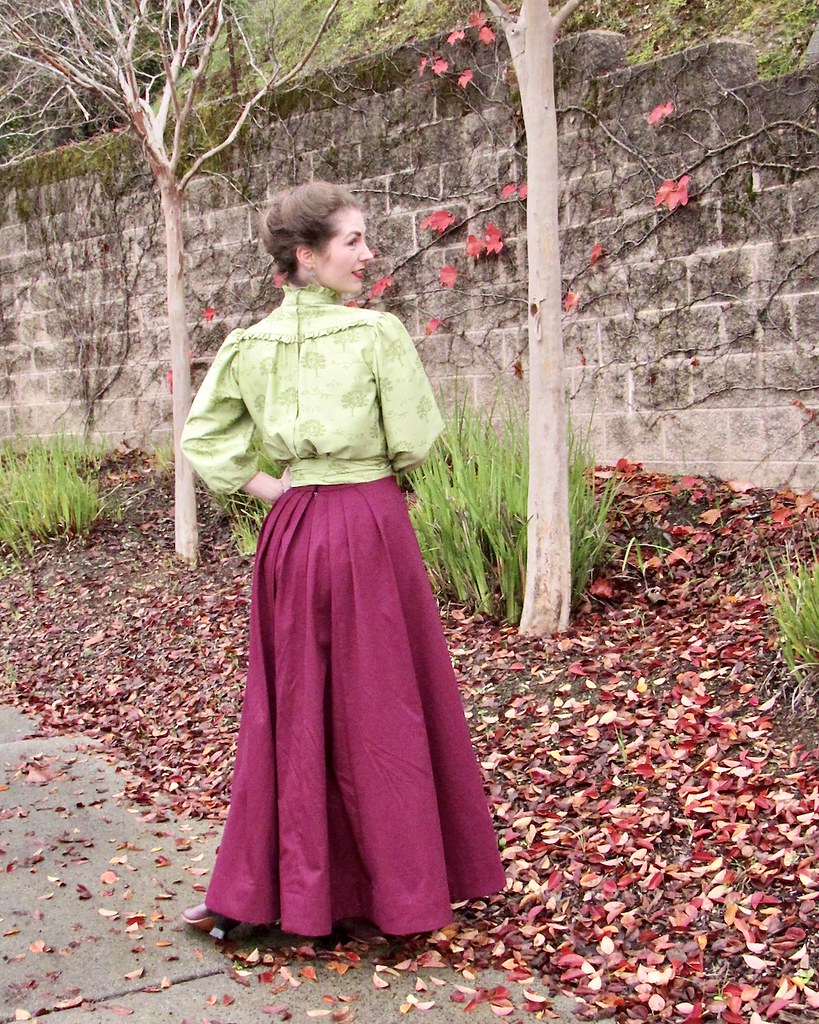
I also added the ruffle along the back yoke.  The pattern does not call for any lace at the back, but I always think it looks lazy/cheap not to add an embellishment all the way around a garment unless that portion of the item will never be seen.  And let's face it, in the real world, everyone is seen from all angles.

The pattern offers two separate options for the closing at center back.  One is buttons and buttonholes; the other is snaps.

Sateen is a glorious fabric, but it does like to fray.   Bound buttonholes would not work for this design, and hand worked buttonholes seemed a bit much for a fairly lightweight fabric.  I really didn't want to take a chance on machine buttonholes, so snaps and hook & bars it was.

At the more closely fitted areas I like to use a hook & bar.  For instance, the neck and at the waist (where the two ties are likely to pull at the back opening) I sewed hooks & bars.  I have had issues with snaps popping open at stress points while wearing theatre costumes in the past, and I've never looked back.

But for the blousey areas, snaps are going to stay shut, where a hook & bar needs a bit of tension to remain closed (at least, most of them do).  Some of the older hooks that I have come across have a portion of the wire that creates a little hump so that you have to tug it into place, and it will stay put.  But for me, in places under no tension, snaps are best, and in places where there will be potential pulling, it's a hook & bar or hook & eye.

There is one other thing to note with this pattern.  The blouse is drafted for a very short-waisted individual!  I usually add a bit of torso length to my bodice pieces, but even though I added 1/2" to the hemline, this garment still feels very short.

If I make this again (and there's a good chance that I will) I plan to add another 1" at the hemline.  And that is more of an adjustment than I have ever made in that area.

The ties are optional, but I think the silhouette created with the definition through the waist really makes this design.

As with the torso length, I should have lowered the placement of the ties.  But they are top-stitched in place, and I don't think the sateen would take well to a seam ripper.  As it stands, the waistband of my skirt is wide, and I should be able to keep the ties hidden.

While I know that the waistband on the skirt I am going to wear with this blouse would look fine with a tucked-in blouse, I thought that a belt made of the blouse fabric would be a nice finishing touch.  I know that Victorian shirtwaists often had matching belts.  Whether or not they were stitched together is discussion for another day, but I think that for my purposes, this will work just fine.

I cut one shaped belt piece on the cross grain and then interfaced it for stability.  This will be worn over a boned skirt waistband, so I didn't feel the need to bone the belt as well.  A second piece was cut 1.5" wider than the first piece and on the bias.

Those two pieces are stitched together along both long edges and turned right side out.

The extra fabric creates a nice bit of texture without looking like a pleated cummerbund or crumb-catcher!  When I purchased this buckle on Etsy years ago, I was a little disappointed that the actual item was extremely lightweight and a bit more chintzy looking than I had hoped.  But I think that the notion was just waiting for the right project.  Thankfully, I keep all of my buckles stashed together in two boxes, so it was easy to find.  And I am really thrilled that I added the belt - it really finishes the look.  My dress form is a too large for the finished belt, but here is an idea of what the finished item looks like.  And now it's ready to be paired back with my new skirt!


Friday, December 10, 2021

Old Fashioned

I was recently approached by Organic Cotton Plus about creating a blog post using their products.  After perusing the website to see what was available, I decided that a skirt made out of their cotton twill would be a great addition to my wardrobe.  The question was, what kind of skirt?  My first though was a tea length circle skirt, but somewhere along the way, I decided to step a little bit out of my comfort zone.

It may have something to do with all of those historical sewing YouTube videos that I have been watching, but for whatever reason, I suddenly needed a Victorian walking skirt in my life.  After digging around in my pattern stash, I finally came across Butterick 3418.  This is pattern I was thinking of, however, the design was not exactly as I had remembered . . . but it was certainly a place to start.

Looking at the illustrations and technical drawings, I surmised that by using the flat front panel from Views A&B, plus the side and back panels of the gathered waist panels from Views C&D, I would have enough extra fabric to create a number of pleats towards the back of the skirt.  And that's really what I wanted - that fanned out shape at the back of a Victorian walking skirt.  I found a few more historically accurate patterns and extrapolated what would work with my 3 yards of fabric.  After a few rough calculations, I decided that adding an extra 1/2" to the waist of each side and back skirt piece would allow for six pleats measuring approximately 1".  I could always use slightly more or less intake for each pleat if the measurements were slight off. 

I wasn't going for historical accuracy, exactly, and I decided that a zipper would work just fine instead of a snap placket. 

I "drafted" my own waistband since the pattern included wasn't quite as wide as I wanted, and added a few pieces of boning to one half of the waistband to ensure it would not fold or crumple during wear.

Two hook & bars were used to close the skirt waistband.  And while I inserted them on the interior side of the seam allowance at first (never managed to make that mistake before - whoops), I also added ribbons for hanging at the waist.

Probably the biggest decision was the length of this skirt.  While I am no expert, my understanding is that these skirts were made for ease of walking.  In other words, they were not meant to drag on the floor, but exactly how far above the ground was acceptable?

This particular pattern is really, really long.  It also has a bit of a train, which doesn't show on the illustrations?!  Maybe they are expecting a bustle to be worn?  I am not entirely clear on that.  Or perhaps this pattern is not meant to be a walking skirt, but a full length skirt with a slight train.  I tried on a couple of longer length skirts in my closet to extrapolate just how long I wanted this one to be when finished.

I ended up removing 6 3/4" in length from the back pattern piece and 3" from the front.  I am not super tall, but I am not short either, so this pattern definitely has some extra length!  And after a bit of research, I decided to face the hemline.  I didn't have much leftover fabric to spare, so mine is only 3" wide, but it still manages to keep the hemline flared out more than it would be without.

I used some leftover black twill as underling for the facing.

I then used those pieces to cut identical pieces out of my fashion fabric.

Make sure to keep track of which end is which if you make curved facing pieces in this manner - these pieces start to look alike once they are cut out!  I know from past experience that it can be very challenging to figure out what goes where if you skip this step.

I have used this method of facing knee length skirts in the past to help create more flare in the hem.  In this instance, I think it not only helps the hemline to flare, but also to keep legs from getting tangled in all of that fabric as you walk.

The facing also finishes the raw hem edge.

From what I can tell, this is not historically accuarate; the hem should be folded, then the facing folded as well, placed together, and hand stitched.  Well, this twill is on the heavy side and not the easiest thing to hand stitch, so I decided to skip that technique!

Overall, I am very pleased with how this skirt turned out.  My dress form still has not learned how to suck in at the waistline, so the waistband cannot be hooked, but you can still get an idea of the finished look.  This is taking me back to my high school days when ankle length skirts were my jam!  Thank you, Organic Cotton Plus, for the trip down memory lane.


[The fabric for this project was received from Organic Cotton Plus in exchange for writing a blog post.]