
As you probably know, I am an avid fan of the bound
buttonhole. One reason is a little
embarrassing to admit, but since I am among friends, I will say it – I am
absolutely terrified of machine-made buttonholes. You would think that I had some terrible
experience, but that is not the case. I honestly cannot think where or when the phobia started.

But enough of my issues, let’s get on with a tutorial! I know there are quite a few of these out
there, but I have had some requests, and perhaps my explanation will help
convert someone to the joys of a beautifully finished buttonhole.

First off, decide what kind of look you are going
for. Bound buttonholes can be completely
utilitarian or may be used as a design detail.
Obviously, color choice plays an important factor, but they can also be
placed on an angle for added interest.
Any necessary interfacing should already be in place. With stable wovens, I
generally do not use any interfacing and have noticed no ill effects. I did use an interfacing on my 1930s rayon dress because the fabric was so drapey.
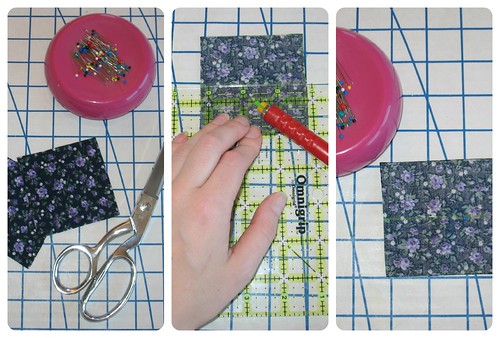
1. Decide on your
buttons and your buttonhole fabric.
I generally create my bound buttonholes before construction
of any kind begins. This way there is
less fabric to manipulate. And if,
heaven forbid, a mistake is made, you have only cut a hole in one piece of fabric
and not a finished garment.

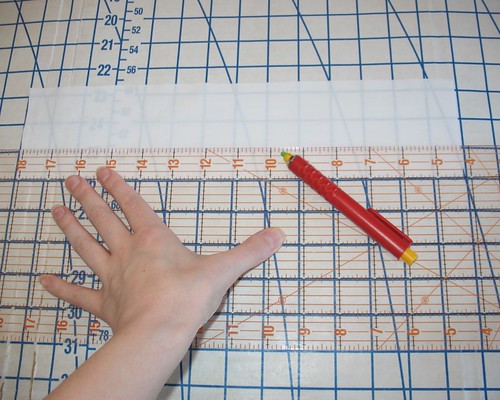
2. Measure the
diameter of the button as well as the width of the button (ignore the shank if
there is one). Add these two measurements
together to calculate the width of the buttonhole you need to create. For tutorial purposes, my button is 7/8”
wide. When it is turned to the side, the
widest part is a little over ¼”. Because
it narrows at the edges, I am going to fudge the measurement and say that a 1”
buttonhole should be sufficient.
Something to keep in mind is that a bound buttonhole is a lot more
flexible than one made with a machine, so if they end up a bit too small, the
button will still fit through the opening.
These days I ignore the pattern pieces (if any are given)
and cut my squares approximately three times the width of the button. Yes, they will sometimes overlap, however,
you can always cut something away, but adding back is a challenge I have not yet mastered - please let me know if you figure it out!
3. Mark the placement
of the buttonholes. Part of the
difficulty in creating bound buttonholes is that you are working on the right
side of the fabric, and markers and chalk may leave permanent marks.
I generally use chalk (or a fabric pen) on the WRONG side of
the fabric – just make sure that the mark will not show through!
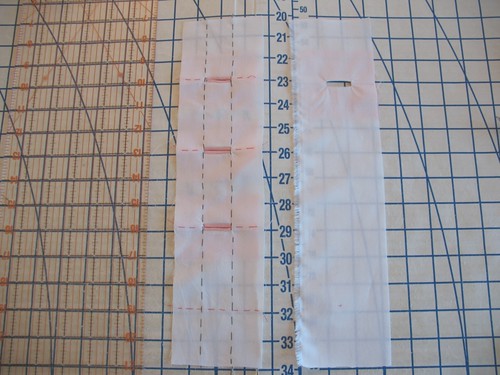
Measure how far from the edge of the pattern piece the
buttonhole markings begin. This is
normally somewhere around the 1” mark, although this is not a hard and fast
rule. Working on the WRONG side of the fabric, draw
a line of chalk or fabric pen along that 1” guide. Because the buttonhole needs to be 1” wide,
draw a second line 1” from the first.
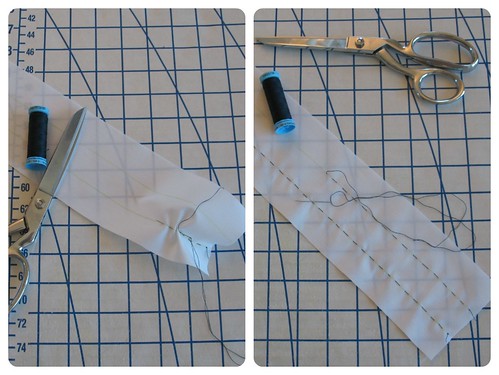
Thread a needle with a contrasting length of silk thread and sew a running stitch
through each of the marked lines. I
would suggest silk thread because it is easy to remove.
[If you are working with a light-colored fabric, make sure that the thread is a similar color or when you remove it, there may be some color transfer.]
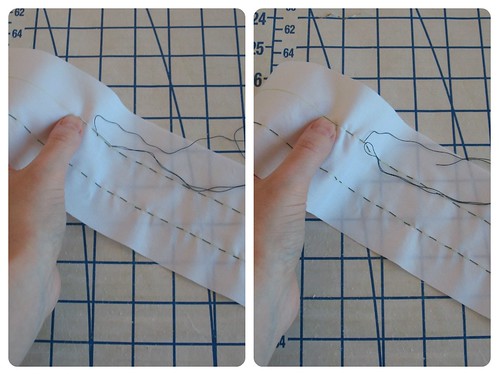
The next step is creating perpendicular lines where the
buttonholes will be sewn. Again, mark
the WRONG side of the fabric, and sew a running stitch as marked.

Your fabric should look something like this. Give it a good press to make sure everything is laying flat.

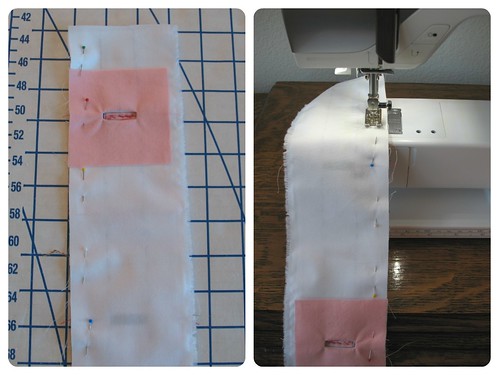
4. The actual buttonhole
will be created with an extra piece of fabric.
I like to use a square that measures three times the width of the
buttonhole. For a 1” opening, I cut a 3”
square piece of fabric for each buttonhole.

Divide the square in half both length and widthwise with a
pen to find the center of the square.
(If I was a better person, I would use more thread to mark these lines,
but since I rarely use white fabric for my projects, the pen marks do not
show.) From the center point, measure ½”
on either side.

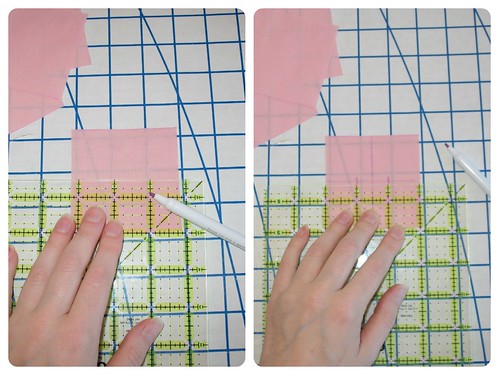
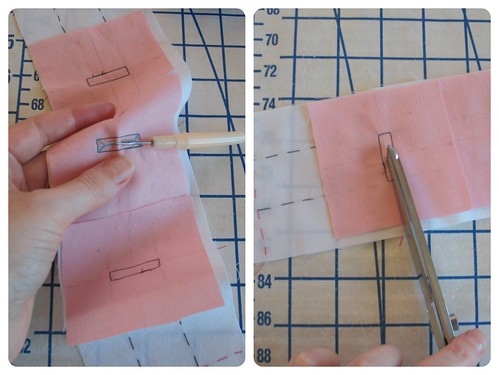
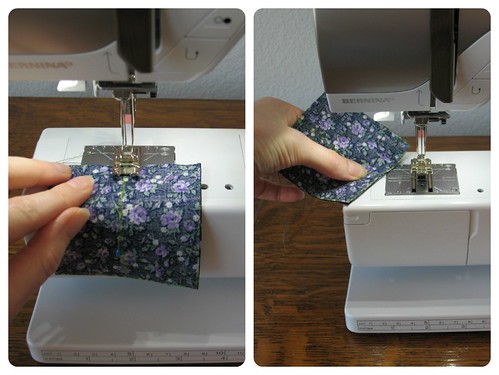
5. Use a pin to place
the buttonhole on the fabric, right sides together, at the cross points of your running stitches.
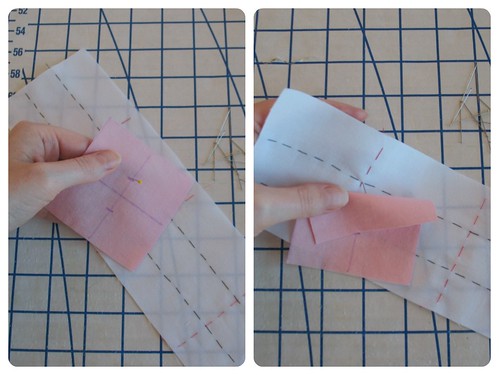
Bound buttonholes are generally sewn ¼” wide. I use my machine’s foot to eyeball the
measurement, but if you are more comfortable, you can draw in the rectangular box shape.
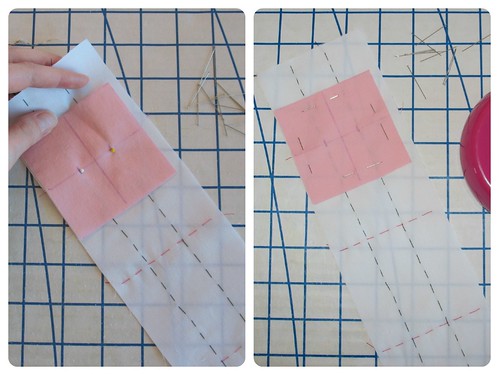
If you are working with a fabric that is easily marred by
pins, I would instead suggest using a length of silk thread with a small needle
to baste the buttonhole in place during construction.

At you machine, you will want to decrease your stitch
length. Later, the fabric will be
clipped close to the stitching line, and a small stitch becomes important.
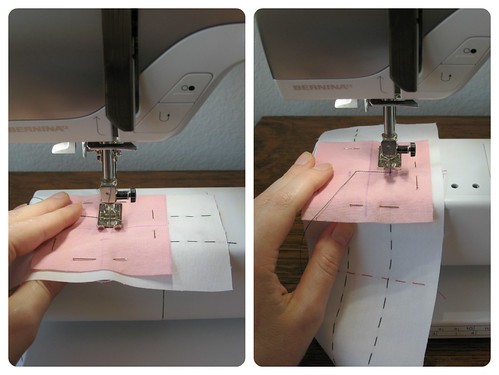
6. I like to begin
sewing in the middle of a long length of the rectangle with my needle sunk into
fabric. DO NOT BACKTACK. Begin stitching until you come to a corner,
sink the needle, lift the presser foot, rotate the fabric, lower the presser
foot and continue stitching until you have completed the four corners. When you come back to the beginning of your
stitch line, cover the first few stitches and then backtack. If you backtack at the start, the lump of
thread may become stuck in the machine.

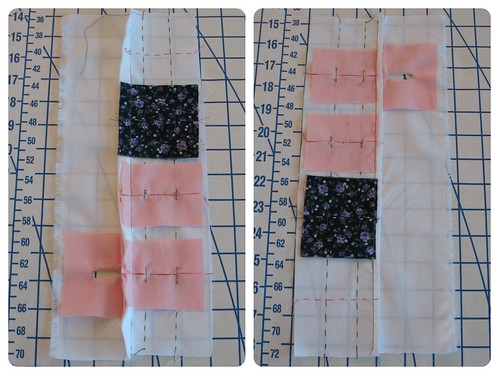
7. Remove the fabric
from the machine and make sure to clip any threads from the front and back of
the piece.
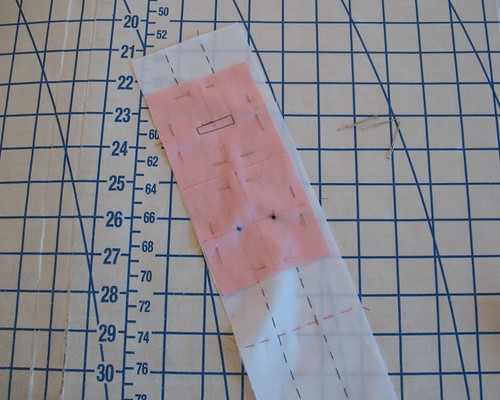
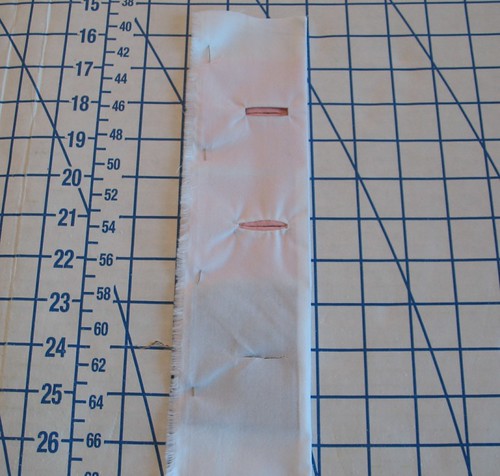
8. Repeat for all of
the buttonholes marked on your particular pattern.

The fabric should looks something like this.


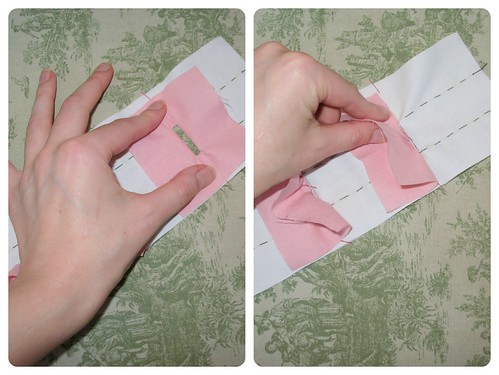
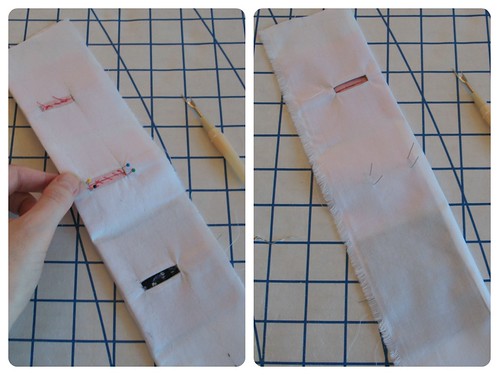
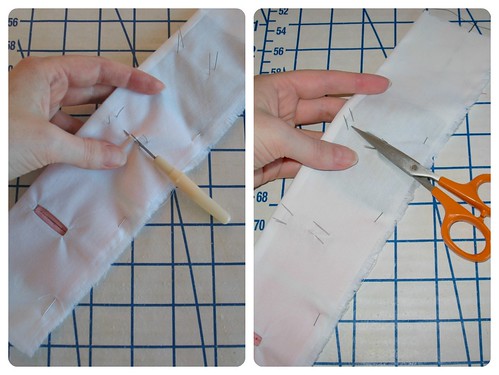
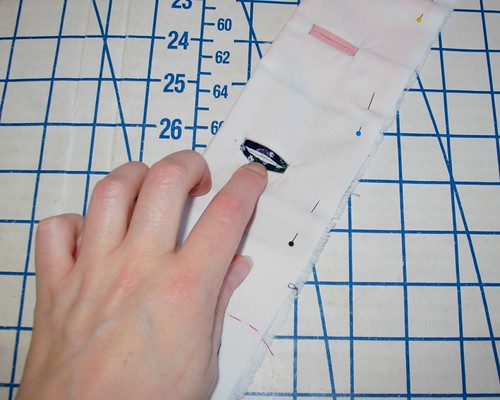
9. Cut the buttonhole
open. Following the blue inked lines in the following image, clipping diagonally to each corner and creating two triangular shaped flaps. It is very important to clip as close to the corners as possible for a clean buttonhole (that's why the small stitch length is so important!).


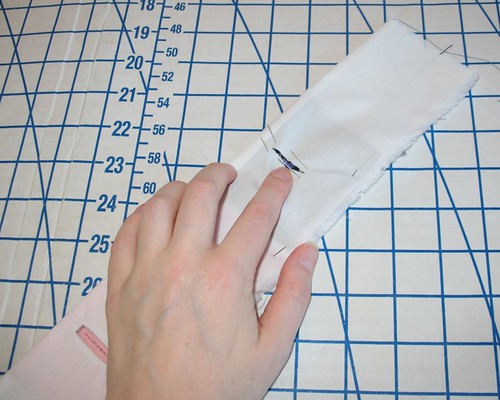
10. Push the buttonhole
through to the wrong side of the piece.


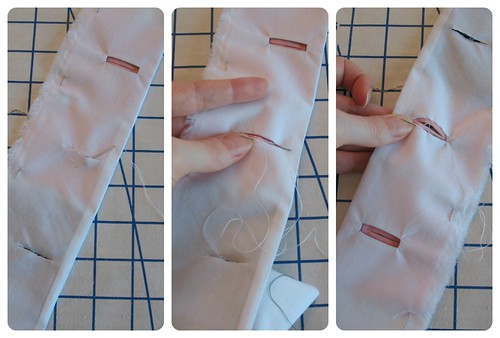
11. Time to
iron!
I like to start on the wrong side
of the fabric. The buttonhole is going
to create two equal “lips” that will fill the ¼” wide window that you just cut open.
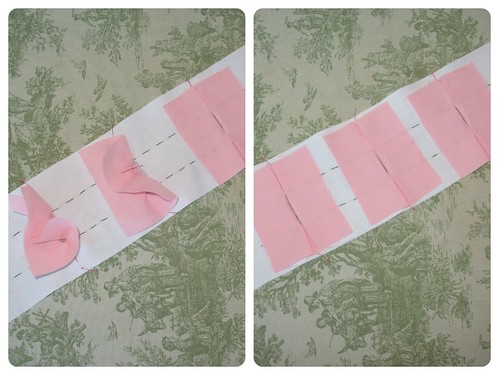
The fabric will be pleated at the
center. Flip the work over to the right
side. If the lips are not equidistant,
now is the time to press them the way you want the finished buttonhole to look.

[If you want the lips to have a raised appearance, you can
insert a piece of cording or length of yarn inside the fold at this point.)
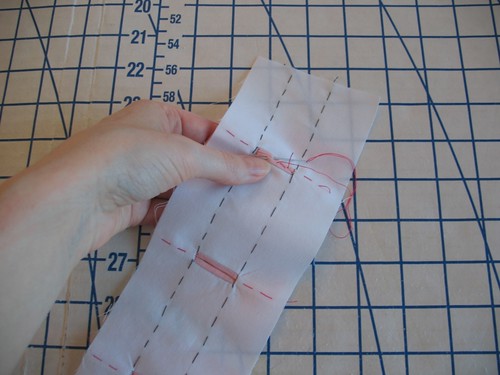
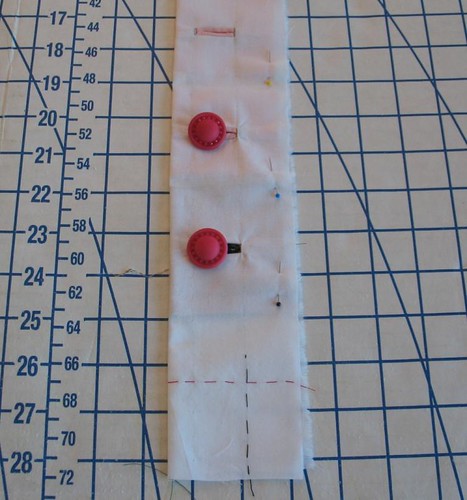
12. The next step is
to baste the lips closed. You spent all that
time getting them to look right, so we do not want them to shift as the
construction process is completed.

13. Now it is time to
secure the square of fabric. Push your fabric to one side to reveal that triangle that you cut. Sew the buttonhole to that tiny bit of fabric.

14. At this point, it
is finally time to start your garment construction.
15. You are almost
there! The only thing left to do is open
the facing piece applied during garment construction directly behind your
beautiful buttonholes!
You can create a second buttonhole in the facing pieces to mirror your
buttonholes, except you will pull the buttonhole all the way open to create a
window.
When the facing seam is graded and pressed, the two openings should match. Working from the facing side, catch stitch the
window to the buttonhole.
The other option is to push pins through from the right side
at each corner of the buttonhole.
When
you turn the piece over, you can tell exactly where your opening is. Use a buttonhole opener (or a very sharp seam
ripper) to tear a small opening in the center of the pinned area so you can use
a small pair of scissors to open the facing, ending at the edge of the
buttonhole. MAKE SURE YOU ONLY CUT INTO
THE FACING!
16. Fold and finger
press the cut opening under and catch stitch.
I like to make a few extra whip stitches at both ends of the buttonhole
to make sure everything is secured.
*EXTRA CREDIT*
If you are working with a heavier fabric, a contrasting
fabric that is not quite as thick is always an option. However, if you want to use self-fabric, this
same technique may be used to create a window.
You will need a thin fabric in a similar color to your fabric (silk organza or
a crisp batiste is a good option). Begin
your buttonhole with the thin fabric and proceed until the pressing stage.

At this point, instead of creating two lips
to fill the buttonhole, pull the fabric square tight and open a rectangular
“window.” Cut two squares out of your
thick fashion fabric to create the buttonhole lips.

Baste these squares, right sides together, at the center line. Press them open so that basting line is in the center, right sides facing out.

Pin the basted piece so that it is centered in the window. Baste the lips to the organza square (they should match because you cut them the same size).

One thing I will say is that this second variation is a lot
cleaner looking. If you are using a
contrasting color I would suggest going this route.
You will avoid any corner issues, and if you are making the buttonhole a
focal point, people are bound to look closer, so you want to make sure they are
as close to perfect as possible!

Does this take a bit of time? . . . yes. But in my opinion, a bound buttonhole adds an
extra special touch to any garment.
And if you made it through all of that, you have the
patience of a saint. Have fun sewing!
Thank you so much - you must have read my mind :) I will be doing my first bound buttonholes this weekend and this tutorial answered quite a few questions for me. For instance, your tutorial is the only one I've found to tell me how big to make my buttonholes for my buttons!
ReplyDeleteWish me luck!
WOW wow wow! Thank you so much! I have often admired your buttonholes and am so glad you have taken the time and trouble to record your tried and tested method for all of us.
ReplyDeleteI think I will give this a try on one of my upcoming projects, and I'll be sure to let you know how it goes. Thanks so much, you are very kind.
Thank you so much for taking the time to create this tutorial. I have other bound buttonhole tutorials bookmarked, but I think this is the clearest one I've seen. I'm now wondering what is in my future projects pile that needs buttons :)
ReplyDeleteThese look beautiful! But much more terrifying than doing a machine buttonhole, I think. :-)
ReplyDeleteReally love your blog.
I totally agree! I can machine sew a buttonhole easy peasy, but the bound ones scare me....maybe it's all the steps.
DeleteTotally brill tute!!
Great tutorial! Thanks!
ReplyDeleteA very good teacher! thanks.
ReplyDeleteSaludos desde Mallorca
María José
Thank you so, so so much for this fabulous tutorial! I've looked around at various bound buttonhole tutorials and this is the first that has finally clicked. And just in time, as I have a number of dresses and blouses I wish to make that require bound buttonholes!
ReplyDeleteThank you so much for the excellent tutorial. I'm wary of machine buttonholes too and about to embark on bound buttonholes in a jacket I'm working on at present. Your explanations are by far the best I've seen on the web.
ReplyDeleteMerci et bonjour de Paris
Carole
This is a great tutorial. Easy to follow and you have a wonderful enthusiasm for your subject. Thank you.
ReplyDeleteWow! Good tutorial! I share your phobia. Lucky for me I know where I can have a professional make buttonholes for me.
ReplyDeleteWhat an awesome tutorial! Like I said before, Bound Buttonhole Queen! :)
ReplyDeleteHi Laura-Mae! I'm very proud of myself because I've just done the bound buttonholes on my coat front piece and facing using thanks to your wonderful tutorial and they worked out perfectly :) But I have a question - I used the extra credit method :) and I now have quite big squares of bulky fabric (I'm sewing with wool) behind my front piece - can I cut them down or should I leave them just as they are.
ReplyDeleteThanks
Beccie :)
Hooray for bound buttonholes!
DeleteI have a habit of choosing ravel-happy fabric, so I usually keep my oversized squares in place until the last minute. If the buttonhole extends past the edge of your fabric, you can absolutely trim it down. I like to use pinking shears so the edges are not as obvious.
If your wool is thick enough to keep the stitches from showing on the right side, you can catch-stitch the buttonhole to your fabric at the edges after you trim it down to size. If the wool is super thick, you can grade the two layers of the buttonhole so the top layer is smaller than the bottom so the thickness steps down instead of dropping off all at once. Just make sure you leave enough so that the slashed and finished facing piece will not expose any raw edges of the buttonhole!
The buttonholes can feel quite thick during construction, but once your lining and facings are in place, the bulk will become much less apparent.
Thanks for replying :) I've cut down and graded the squares and lip pieces, and it all seems much less bulky and easy to deal with. I'm so proud of my buttonholes!! Thank you!!
DeleteIndispensable - bookmarked! Thank you so much for such a detailed and comprehensive tutorial.
ReplyDeleteThank you so much! I just happened upon your blog and am so happy. I don't even make garments that have buttonholes because I am totally afraid of buttonholes too. I just cannot get the machine buttonholes to work and I have tried on several different machines. These look so easy! I am going to have to add a garment with buttonholes to my list.
ReplyDeleteExcellent! Thank you.
ReplyDeleteThank you so much for taking the time to make this tutorial. I'd never even heard of bound buttonholes before, so this is blowing my mind. I'm modifying a dress right now and have been putting off making the buttonholes, so this will help me immensely.
ReplyDeleteOoOoH I've bookmarked this, your tutorial is so clear and very easy to follow. Thanks Laura
ReplyDeleteYour bound buttonhole tutorial is wonderfully detailed and precise! Definitely a keeper and one to share with others!
ReplyDeleteOH thank you! I was driving myself nuts thinking how to do a doable double sided bound buttonhole. Your explanation help me to understand the concept and perhaps finally work on the jacket I plan to make soon... :)
ReplyDeleteThat's what it's here for! And good luck with the jacket!
DeleteThanks :) I have to wait till I can get my hands on the pattern though. My husband was trying to save money by printing the pattern on both sides of the paper!
DeleteThank you for the lovely photos. I am a drapery seamstress and am starting to get into sewing clothes! I did as you indicated and created a strip of bound buttonholes. They came out "passable" but I realized I needed more precise equipment than my heavy duty Consew machine. I pulled out my Grandmother's 1956 Singer Featherweight and they came out like a DREAM- thanks again! :)
ReplyDeleteYou are so very welcome! I always love to hear of another bound-buttonhole convert!
DeleteThis comment has been removed by a blog administrator.
ReplyDeleteBrilliant! I've been looking for info on how to do bound buttonholes and just been left baffled. Your tutorial makes complete sense. I'll be having a go for myself. Thank you.
ReplyDeleteHello Laura Mae,
ReplyDeleteI was wondering what the smallest size is that one might make a bound buttonhole? I mean, before it is just too fiddly.
I seem to be having no luck with machine ones (I've tried several sewing machines and vintage attachments).
Cheers, Sarah
Sarah,
DeleteI don't think a small bound buttonhole would be especially fiddly so long as the fabric does not fray terribly, making the tiny triangle cuts shred before you can stitch them to the buttonhole. However, depending on the width of the lips, they might start to look a bit stumpy. You might try a few tests with very narrow lips to see how that works with your fabric.
If you are working with a fabric that is not too heavy, you might also try adding rouleau loops instead of buttonholes (although this may require a bit of redrafting to your opening edges so everything looks centered).
Good luck!
Thanks so much for your advice, Laura Mae. It is much appreciated. I have tried out a larger size to practise but haven't tackled a small one yet. (I can't seem to make nice machine-sewn buttonholes at all - I have tried on several machines, and tried vintage attachments too.)
Delete