Showing posts with label Vintage Pattern Lending Library. Show all posts

Tuesday, April 22, 2014

Out of Season


Normally as soon as the beautiful weather appears, I like to banish the black and the wool from my wardrobe.  Even if I end up chilly by the time the sun goes down, I would rather wear something to suit the sunny skies.  Not to mention the fact that the winter-appropriate side of the closet gets tiresome after a few months, no matter how much I may love certain items contained therein!


So even though I am going to do my best to wear Spring things from here on out, I managed to finish my Ceil Chapman dress in time for Marin Symphony’s latest concert, and I really wanted to take her out for a spin before the heat made it impossible to wear a black wool dress.  It actually turned out to be quite comfortable for April weather with the short sleeves.  


The concert was magnificent, by the way!  And an evening of Carmina Burana and Chichester Psalms somehow seemed like the proper event to debut this dress.  


The issues with the invisible zipper on my latest Britex project gave me the courage to fix the zipper on this dress.  And as a few of you mentioned, the problem was actually solved with minimal fuss.  The most irritating part was picking out black thread on black wool.  Thank goodness for that organza strip I used to stabilize the zipper, or else I might still be going at it with a seam ripper.


It really feels good to have finished this dress.  I am not a complete failure!  Whoo-hoo!


Not only can I now zip the dress up, I can do so all by myself!  All it needed was a sturdy standard zipper!


Dress & Belt: Made by me, Spadea 1251 c/o Vintage Pattern Lending Library
Shoes:  Nina
Earrings:  Givenchy
Ring:  Grandfather’s school ring
Hair Flower:  Made by me
Clutch:  Banana Republic

Sunday, March 9, 2014

Getting There


Progress continues on my Ceil Chapman project.


Instead of adding a lining to an already intricate design, I decided to go the easy route and underline as suggested by the instructions. 


The back skirt drape, which I initially thought was tacked on top of a fitted skirt or attached with a belt, turns out to be part of the actual design and held at the center back with two internal “lining” pieces.  I do not agree with the description, and would consider those pieces a "stay" to help the soft pleats remain in their proper place.


After living on my dress form for a couple of days, the pleated section started to drop (not very surprising as it is cut on the bias).  I find straightening a hemline to be a tedious process, so doing a bit here and there in between more interesting parts of construction helps to make it less painful.


To keep the bodice lining neck edge from stretching, I added a length of seam binding and stitched just inside the seam allowance.


And I ended up replacing the given neckline facing with a bias strip of my bemberg lining.  


This midweight wool is probably a little on the heavy side for this design (the sleeves were my first hint) so adding more bulk with a wool facing did not seem like a great idea.


For raw edges that were too bulky for a single fold of seam binding, I used two.  Two lengths were applied, one on each side of the seam, at which point the top edges were stitched shut with a zig-zag stitch.  This process was used on the waistline seam as well as the armhole edges.


This is really starting to look like a dress!


Tuesday, February 4, 2014

Origami Sleeves


Another wonderful feature of this design is the rather intricate sleeve.


When it comes to measurements and drafted pieces not matching up (vintage or contemporary patterns alike), I always assume I am the one who has made the error.  However, when it comes to directions, I often find myself second guessing the illustrated diagrams and wording even before getting the pieces in my hands.


And I have to admit that when I happened upon the diagrams for this sleeve craziness, I scoffed.  What were they thinking sewing things with raw edges out?!  Well let me tell you, the writer of these particular directions knew exactly what they were doing with these origami-like creations.


Thank you, my muslin, for proving me wrong before I made a huge mistake!  By the way, all of those bias cut layers use a lot of fabric and I would have been rather peeved if I had to re-cut them out of expensive or precious material.  


They also look very similar.  To help keep everything straight, I pinned the letter names of each individual piece right on the fabric until the sleeve was completely finished.


Fabric choice becomes important with these sleeves.  I am using a mid-weight wool, and anything thicker would make them just about impossible to construct.  There is a whole lot of bulk going on here and a bunch of trimming of seams.  If I found a fantastic brocade that demanded to be made up using this design, I would probably opt to do without all the extra overlapping pieces.  I think a plain three-quarter length sleeve would go beautifully with this look, although for my first attempt I am sticking with the original – if only for the challenge!


First misunderstanding resolved!

Tuesday, January 28, 2014

Does Size Really Matter?

Last year I was contacted by Deirdre of Vintage Pattern Lending Library and asked if I would like to test a pattern reproduction for her.  Umm . . . YES!  But it gets better . . . one of the choices was a 1958 Ceil Chapman design!!  And I am somewhat partial to Ceil Chapman since I had such fun working on my Emerald Green Gown a couple of years ago. 


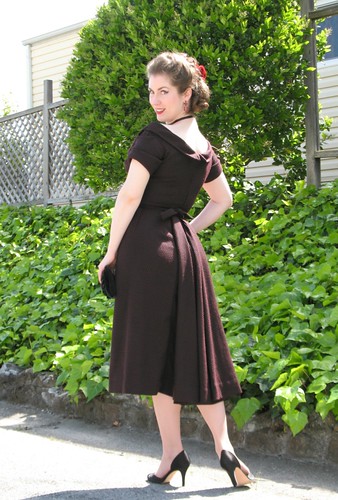
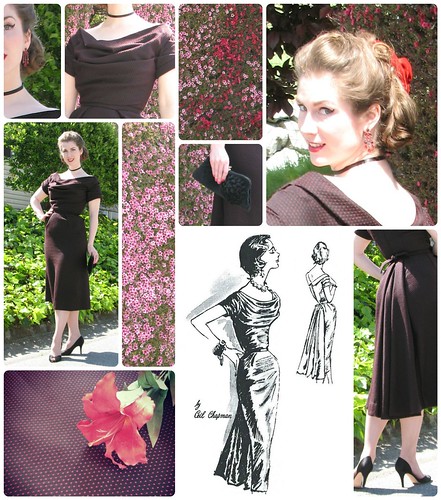
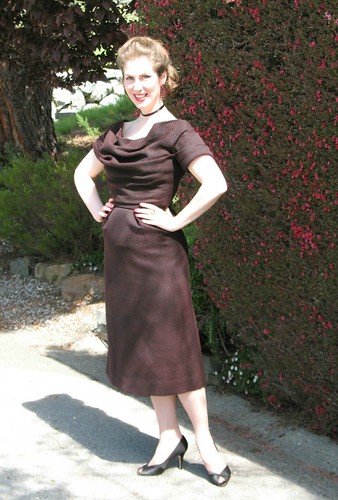
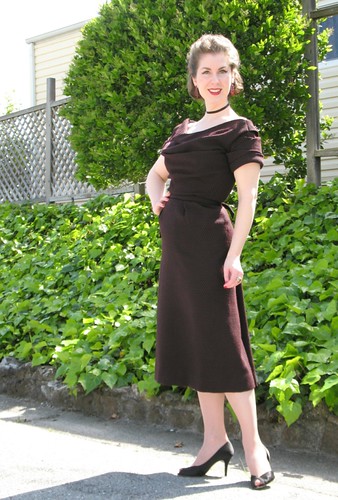
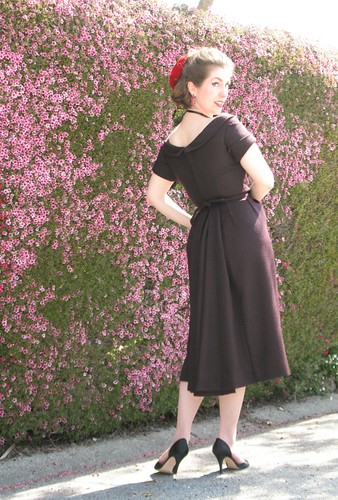
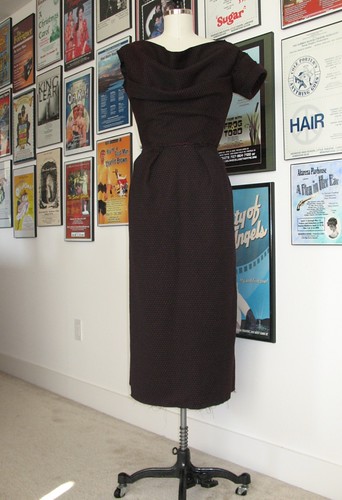
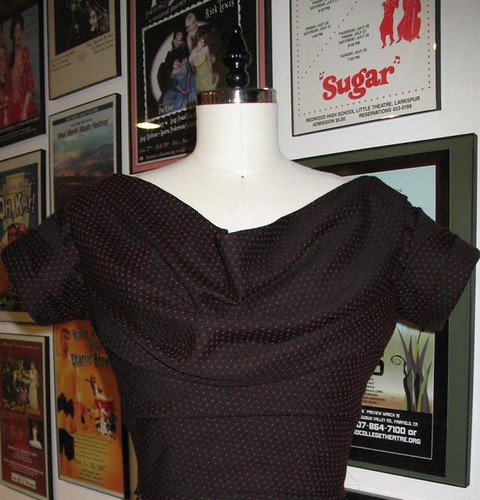
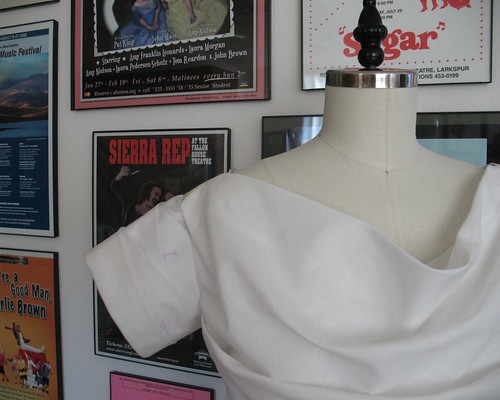
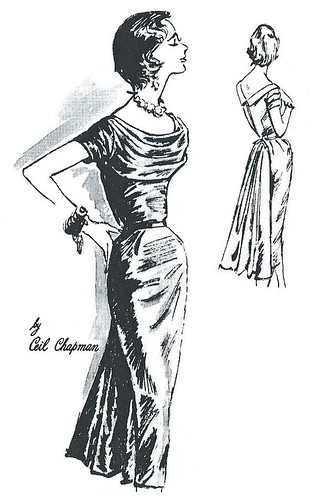
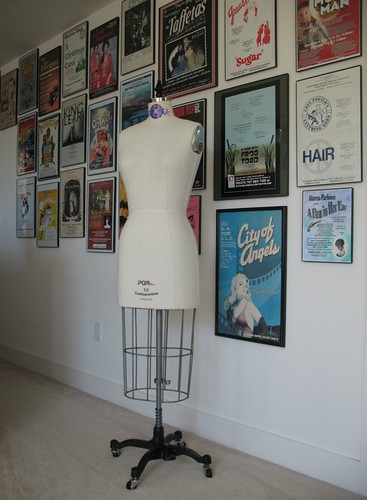
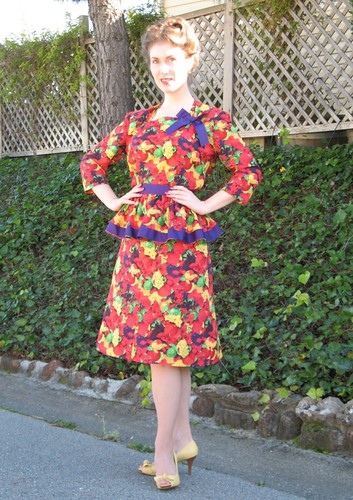
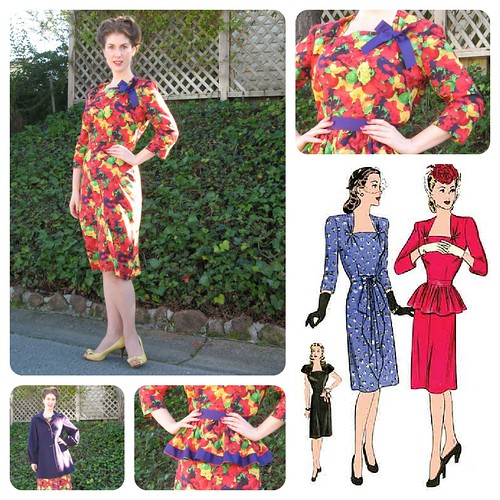
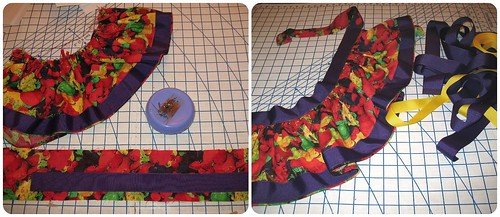
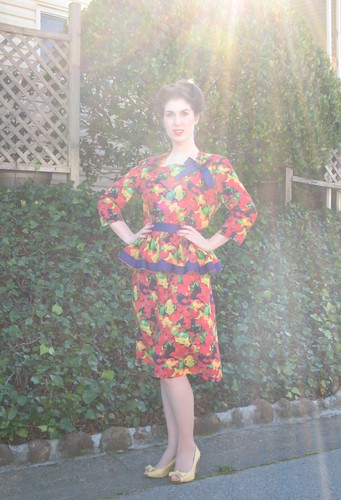
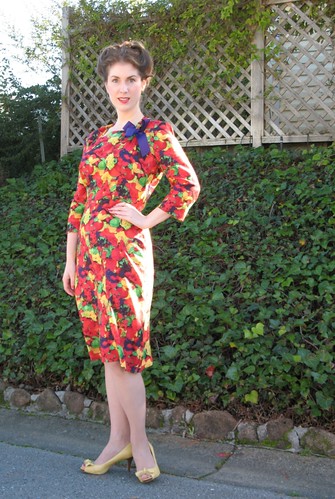
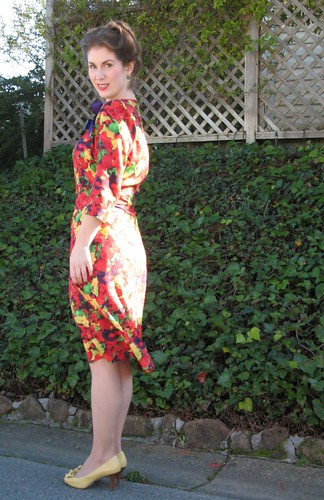
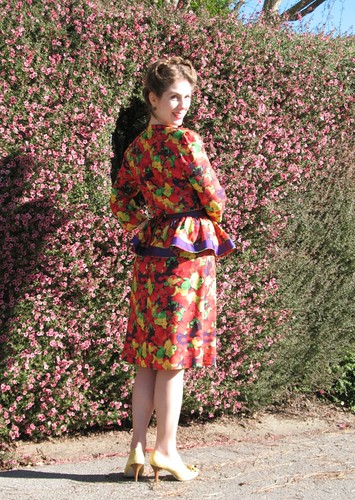
Now I have my very own copy of Spadea 1251 – and so can you!  How awesome it that?!  A glorious and rather complicated design has been made available for more than one lucky soul who grabs the original for crazy sums of cash on ebay. 


Sizing is a little bit different for Spadea designs than other vintage patterns – it assumes more extreme measurements than your standard patterns from the 1950s.  When I was working with my first Ceil Chapman pattern, I came across this site which has some great information about the brand. 

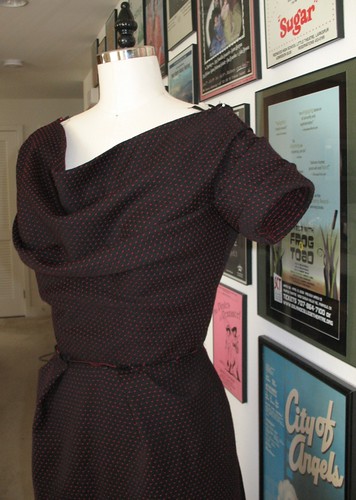
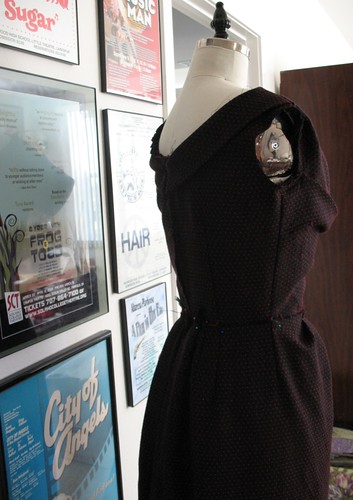
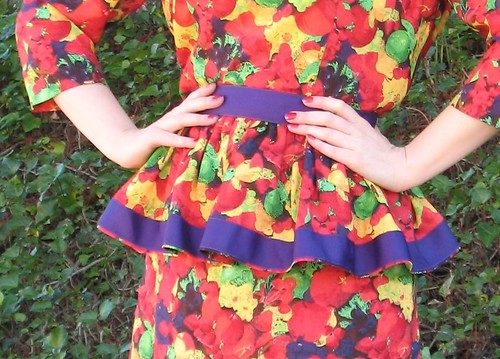
This pattern is copied from a vintage size 12/35” bust, so it would have been the master pattern from which the other sizes were graded.  The measurements are as follows:  35” bust, 25” waist, 36” hips.  There seems to be a misconception that this was standard for vintage patterns in the 40s and 50s.  And looking at images from the period, I can understand why!

This got me thinking about sizing charts in general, so I dug out a few of my 1950s patterns. 

The following sizing charts are from patterns in my possession that are from the 1950s, either by copyright, or by my best guess after looking at the style lines and envelope illustrations.  Here is what is listed as a Size 12.

McCall

Simplicity

Vogue

Hollywood

Advance

Butterick

Mail Order

Bust  30

Bust  30

Bust  30

Bust  30

Bust  30

Bust  30

Bust  30

Waist  25

Waist  25

Waist  25

Waist  25

Waist  25

Waist  25

(no measurement given)

Hip  33

Hip  33

Hip  33

Hip  33

Hip  33

Hip  33

Hip  33


They are all the same!  But more interesting than that, these are not exactly the va-va-voom measurements that one might expect.  Instead, they seem more appropriate for contemporary clothing and figures with less of an emphasis on a small waistline.

The only exception to this standard is Spadea.

Spadea, it turns out, used a ready-to-wear size chart for their patterns - which is more in line with the girdled and curvy figure ideal of the 1950s. 


For more of a comparison, I went to find what Gap Corp. thinks are appropriate measurements for a contemporary body (one which does not wear a girdle on a daily basis).  As expected, the size numbers are utterly ridiculous.  Our vintage size 12 with a 25” waist has now become a size 0/XS  (Bust32” - Waist25” - Hips35”).  This is not as extreme as the ready-to-wear size chart of the 1950s, but still caters to more curves than the 1950s pattern sizing, which I find strange.  Clothing that is produced today does not take these proportions into account, so what is the point of their size guides?

Ready-to-wear clothing in the year 2014 does not seem to follow its own prescribed measurements, just as contemporary patterns from the Big 4 tend to offer more ease than is necessary for their size chart.  The McCall Company’s contemporary size 10 is 32.5” -  25” - 34.5”.  That is more extreme than the standard pattern sizing chart used in the 50s – a decade that epitomized the wasp waist and celebrated the hourglass figure.  Go figure! 


When did sizing get so darn complicated?  And why is it that people are so hung up on the number found on a tag in the back of their pants – it is meaningless without some kind of context.  The rumors that Marilyn Monroe was a size 14 are, in fact, true – those numbers do not, however, have anything to do with contemporary American sizing, or take into account that she had a smaller than average waistline.  

So where did these arbitrary numbers come from?  Who decided that double digits mean a person is "fat"?  And what the heck does "00" mean?  Do we now long to occupy so little space that we disappear?  And in forty years will "00000" be the average size of a supermodel?  How many X's can you put in front of a size small before it becomes ridiculous?

Considering the variation that exists with the basic human body (a torso with four limbs attached including various squishy bits and fat deposits in different locations), it is a miracle that anyone looks halfway decent in clothing made to reflect an "average" build.  It certainly makes me grateful for the ability to make my own clothes!!

Yikes . . . that was not where I expected this post to go . . .

I am not sure what any of this has to do with a glorious Ceil Chapman design, but now that I have said it, I feel so much better and can get back to my happy sewing space!  

Sunday, September 29, 2013

Whatever Lola Wants

I finally did it! 


I purchased a dress form!  

It has been on my mind for quite some time, so when PGM Dress Form had my size back in stock, I grabbed one.  The form was purchased through their ebay store.  I was outbid two weeks ago, but when I tried again last week, no one else seemed to be searching for this particular form.  Lucky me!

Lola is decidedly slimmer through the hip than me, but I can always pad her.  And she does not have my squishy bits, but I will not hold that against her.


And, unlike me, she does not mind pictures taken of her naked form.  But to keep things from getting too scandalous, I put a slip on her.


Someday I hope to have a Wolf Form made to my measurements, but at this point, that is about as likely as owning these shoes.

I keep waiting for the excitement to pass, but every time I walk by her, I giggle - I finally have my very own dress form!


Slip:  Made by me, VPLL T1136

Tuesday, August 6, 2013

A Special Project

If you have been reading this blog for any length of time, it is probably obvious that I will take any and every chance to dress up.  For the past few years, I have had the opportunity to volunteer at the Marin Symphony Gala - and it is a fabulous opportunity to go all out!  Last year I made a blue brocade and satin gown for the occasion, and the year before I made my favorite Emerald Green Gown.


I usually start looking for inspiration at least a year in advance.  Years ago, I lusted after this reproduction from The Vintage Pattern Lending Library.  It disappeared from the site, and after numerous emails without any response, I figured I had missed out on getting a copy.  Drat!  It is an Advance Import pattern from the 1950s and finding an original copy would probably be impossible.  But earlier this year while I was wandering around online, I noticed that it had reappeared.  Whoo-hoo!


Britex Fabrics has generously sponsored this project.  I will be working with an amazing silk/linen blend and some beautiful vintage buttons. 


But before I even pull the fabric out of the bag, there is a lot of work to do!  As always, my intention is not to be stitching last minute details the day of the event . . . I have never managed this in the past, so we shall see how it goes!


[The fabric for this project was received in exchange for my contributions as a Britex Guest Blogger.]

Saturday, December 22, 2012

Carmen Miranda’s Favorite Fruit Salad


This is one of those online fabric purchases that looked nothing like what I expected, so it sat in a drawer for a bit.  Does this look like “brown fruit print challis”? – yeah, that’s what I thought.  Brown is perhaps the only color that is not present.


And then I remembered that I wanted to make the peplum version of this dress.


One fun part of using a pattern I have already worked with is that most of the preliminary work has already been done!  And, of course, I know what to expect.


To break up some of the crazy colors, I added grosgrain ribbon.   


My first thought was to layer a yellow ribbon over the purple, but I decided that was too cheerleader uniform. 


I was also going to add two grosgrain bows to the neckline corners.  The neckline treatment is so unique that I did not want to duplicate it, seeing as I already have a version in blue.  But the two bows looked too cutesy, so I decided to settle for one.  Hopefully the peplum and fabric choice helps to differentiate it from my other dress!


While I was over at mom’s getting pictures taken, her neighbor said I needed a Carmen Miranda hat to top off the outfit – and I absolutely agree.  How did I miss that?!


I know some people will be horrified, but the peplum is detachable!


And here is the dress without the peplum.  I think I will save a length of purple ribbon to tie in a bow for those days when I choose to leave the peplum at home.  


Or perhaps it could be a day to evening transition piece? – Peter must be rolling his eyes at my inability to make a decision and stick with it!  To peplum or not to peplum, that is the question!


Dress:  Made by me, Hollywood 1449 via VPLL
Jacket:  Banana Republic
Shoes:  Alfani
Earrings:  Liz Palacios