
I knew going in that this project was not going to be the
easiest dress I have ever worked on. And
that is fabulous – I love challenging patterns - I wish that contemporary
offerings were this involved and creative.

But I am never prepared for the difficulties that arise from
drafting mistakes. Why do I always assume
that pattern markings are correct? As I
have mentioned before, I expect instruction errors, but drafting errors make me
feel like I am a complete newbie with no sewing skills whatsoever.
My first Ceil Chapman for Spadea design experience was
somewhat similar. The sleeve would not
set-in properly. I made it work, but still
wondered what the heck I was missing.
Months later, I received an email from someone working with the same
pattern who was having the very same issue.
Oh my goodness . . . it wasn’t me!
I am not a nincompoop!
But fast forward a couple of years, and I once again think
that Spadea walks on water. Not only
that, Deirdre generously sent me this pattern to test and I was failing
miserably.

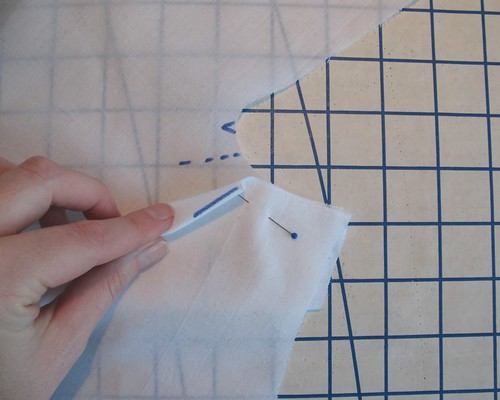
The blue lines are the original markings on the Skirt Front.
So here is what happens if I follow the instructions: crease on the solid line and bring fold to
the dotted line to create a pleat. What
a mess. Attempting to manipulate the
fabric this way meant fighting the grainline, not to mention the jagged edge that
was created would never match back to the bodice. Aargh!!

Okay, let’s ignore that piece for the moment because I am feeling a wave of crankiness come upon me.
The Waist Front gets pleated and then basted to the Bodice Lining (which looks very much like a standard bodice). Sounds easy.
The Waist Front gets pleated and then basted to the Bodice Lining (which looks very much like a standard bodice). Sounds easy.

The bottom pleat comes up, and the top pleat folds
down.
Crease the bottom solid line,
bring it up to the dotted and suddenly all the jogs and curves disappear into
the lower curve of an armhole and the side line of a bodice.
Beautiful! I’m on a roll now . . .

Deep breaths . . .
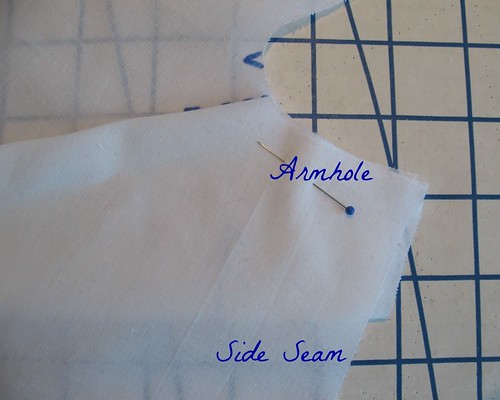
In a perfect world, this piece is going to match back to a standard bodice, and I need at least a seam allowance worth of armhole to attach the sleeve. (From reading ahead in the instructions, I know this is a standard set-in sleeve.)
In a perfect world, this piece is going to match back to a standard bodice, and I need at least a seam allowance worth of armhole to attach the sleeve. (From reading ahead in the instructions, I know this is a standard set-in sleeve.)

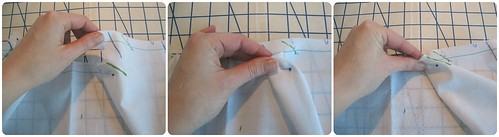
When I try to make it look like the diagrams, this is what I come up with – that looks a whole lot better!

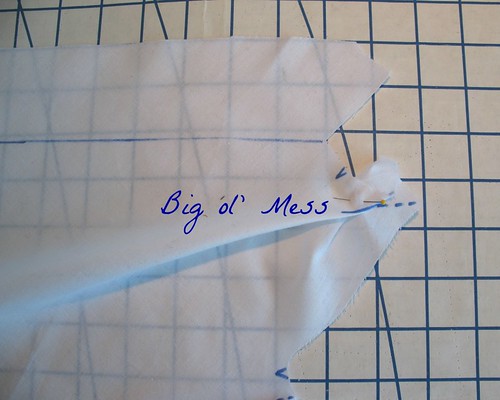
Out of curiosity, I take a Sharpie and draw lines along the
folded edges. Remove the pins, open the
piece, and what do I discover? The
original lines on the pattern pieces have only one point in common with the new
fold lines, and this happens at the 5/8” seam allowance mark.

Interesting . . . but rather confusing.

Time to get back to the skirt.

Obviously, the waist seam needs to match back to the bodice waist seam, which is basically a straight line.
Obviously, the waist seam needs to match back to the bodice waist seam, which is basically a straight line.
If I ignore the lines except at the 5/8" mark and follow the upper edge, things start to improve. The remaining portion that sticks up is folded downward until both raw edges match. The newly created fold line is pushed back towards the remaining dotted line at the 5/8" mark.
Now I have an upper skirt edge that I can work with!
But I am not looking to decode one of Da Vinci’s diagrams when I work with a pattern – I want clarity! I like to think that if I was given a vintage perforated pattern without any instructions, most days I could piece together a reasonable facsimile of the original. If I was handed these particular pieces, I would have absolutely no clue on how to proceed. But that is what diagrams and illustrations are for!
But I am not looking to decode one of Da Vinci’s diagrams when I work with a pattern – I want clarity! I like to think that if I was given a vintage perforated pattern without any instructions, most days I could piece together a reasonable facsimile of the original. If I was handed these particular pieces, I would have absolutely no clue on how to proceed. But that is what diagrams and illustrations are for!

I cannot claim that this was the original
intent of the design, but after studying the shading on the illustration, I
think I came pretty close!
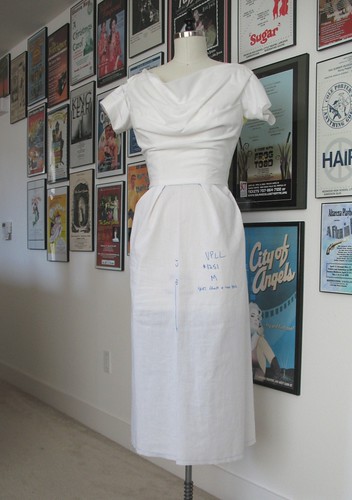
So while this part of the construction was extremely
challenging, and a bit frustrating, I can honestly say it is the most fun I
have had in quite some time now that I have cracked the code! And the design is so worth the effort!
*P.S. I have had a few questions recently about why I make muslins. This is an excellent example of why they can be so essential to a project. If I had cut into my wool and had to repeatedly manipulate the upper edge of the skirt to try to figure out what was happening, it would have made an awful mess and I might even have ruined the piece. With a mock-up, I can make all sorts of marks, use contrasting thread that is easy to remove if a mistake is made, and I can always cut another piece at minimal cost if things really go sideways - not to mention the ability to fix errors that may be hiding within the pattern itself - because they just might exist!*
*P.S. I have had a few questions recently about why I make muslins. This is an excellent example of why they can be so essential to a project. If I had cut into my wool and had to repeatedly manipulate the upper edge of the skirt to try to figure out what was happening, it would have made an awful mess and I might even have ruined the piece. With a mock-up, I can make all sorts of marks, use contrasting thread that is easy to remove if a mistake is made, and I can always cut another piece at minimal cost if things really go sideways - not to mention the ability to fix errors that may be hiding within the pattern itself - because they just might exist!*
Hi Laura Mae. This is a great tutorial and the best evidence for making a toile. Looks like the pattern markings were put on by someone other than pattern maker because the outside cut edge of the pattern shape did finally work. A fabulous piece of detective work on your part. It looks like a wonderful frock and I would love to see your final results. Great work you!
ReplyDeleteNow that is interesting - the pattern drafter might be a different person than the marker . . . I never even thought of that possibility, but it does make sense.
DeleteI can't wait to see this all made up, it's going to be a knock out!
ReplyDeleteOMG, I'd be tearing my hair out and sobbing loudly. The muslin is looking great though. So glad you figured out the problem!
ReplyDeleteOh you would not!! I actually thought of you while I was grappling with this - my exact thought was "Peter would not be having this issue!".
DeleteI'm so happy to see all the steps as you're walking through this pattern. These early Spadeas were made by pattern-makers who started with a finished retail garment, took it apart, made pattern pieces, graded them to different sizes, and then tried to explain to the average home-sewer how to make the dress from scratch. The patterns were cut and notched by hand in their factory in New Jersey, which may explain some pattern-marking discrepancies. The patterns really are a record of the fashions of that period. I'm so glad you're bringing this one back to life.
ReplyDeleteI don't know if you know how perforated patterns were made but they stack a whole bunch of tissue paper on the perforation machine and they have a huge punch that punches the holes in the pattern like a 3 hole punch for a pattern. But when you try to use too many pieces of paper in a 3 hole punch, some times the bottom ones get skewed and the holes don't align perfectly. This happens when they make perforated patterns too so maybe your copy was one from the bottom of a stack.
ReplyDeleteI've never seen anything this bad from punch hole misalignment but I have seen some odd things like grain line markings not being perfectly straight.
That is a good point – I know that one of the reasons they got rid of the perforated pattern was because it was not always accurate (and I, too, have come across the bowed grainline marking!). In this case, however, the line markings given are in a completely different direction from where they “should” be which makes me think it is more than just a punch error. Then again, I could be reading the markings wrong – I think it looks close to the illustration, but it is hard to tell with all that shading!
DeleteIt's a vintage mystery!
how annoying! it looks like a cowl neck rather than pleats as on the diagram,that would bug me.
ReplyDeleteThat is probably my fault with the terminology. The final look is draped, but those drapes are achieved with the use of loose pleats (or folding and stitching in the seam allowance - perhaps the use of the word "pleat" is not the best). But the fact that the markings were so far off from the jagged edges is odd . . .
DeleteI think in a former life you were a pattern designer for Ceil Chapman:) Or maybe it was Dior:) This brings to topic that it is okay to not be exact with instructions and to have the freedom to get where you need to go. Thanks for showing us these illustrations.
ReplyDeleteExcellent post and explanatory photos, I can't wait to see the finished gown. Isn't it funny that we immediately think that it is us just not getting the pattern marking or instructions, rather than a possible drafting/marking error. I don't now how many hours I wasted trying to figure out something because well, "the pattern couldn't possibly be wrong it must be me". Then as I got more experienced I realised that sometimes there are errors and that is OK, you just have to figure it out.
ReplyDelete