
In my last post, I made reference to two of the pattern adjustments that I almost always make to the back bodice of any pattern: an erect upper back/flat upper back adjustment, and a long torso adjustment. I had quite a few people ask about what I was describing, so I decided to clarify those adjustments here. I rarely see any reference to the flat upper back fitting issue. People mention full bust adjustments, and small bust adjustments, and sway back adjustments all the time, but I really never hear about erect upper back or flat upper back adjustments! Maybe that means there are not many people who require the alteration, but perhaps it will help someone out there with a similar issue. In short, most standard blocks allow for a slightly rounded upper back as the average human body has that shape and requires slightly more fabric to cover that rounding. Since I don't have that rounding, mostly due to my posture, I think, I don't need that extra fabric, and it pools below my shoulder blades. This is one way to remove that extra fabric.
The major thing to remember about this adjustment is that it must be done prior to cutting out your bodice back. It's best to figure this issue out ahead of time!

All of my life (or at least as long as I can remember), I have known that I have a longer than average torso. There is a story that as a child in diapers wearing a jumpsuit at a party, some guy made a comment about how short my legs looked. Thanks a lot, rude man, but clearly, my torso is longer than my legs. Both of my parents have long torsos, so it's not a surprise that I do as well. And it's certainly one of the reasons why I am such a fan of high heels! It's all about proportion!!

After I started making my own clothes some twenty years ago, I figured out pretty quickly that a long-torso adjustment would help with the fit of the clothing that I was making. It took a lot longer to figure out what to do with the excess pooling on the back of the bodice somewhere around bottom of my shoulder blades.

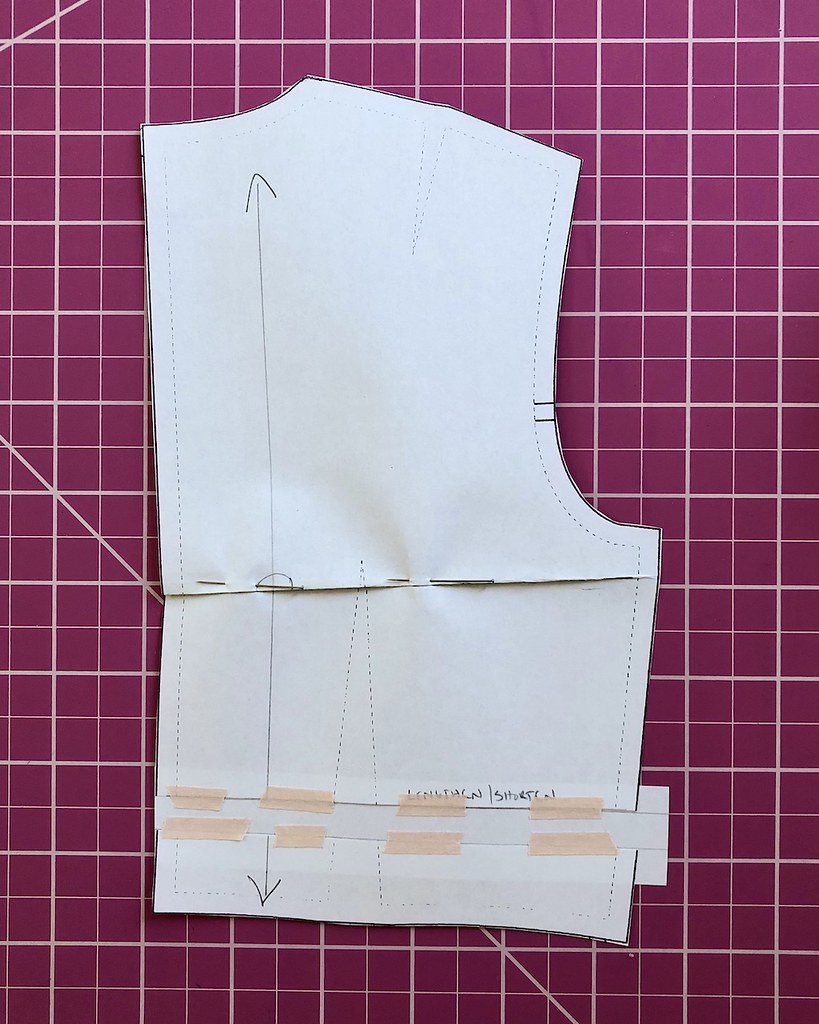
The first adjustment I make probably looks familiar to most people. This is the easiest way to lengthen (or shorten) a bodice. A lot of contemporary patterns will include a lengthen/shorten line with other printed information right on the pattern pieces. It's best not to add the length at the bottom of the pattern since it will affect the waist measurement as the side seam will continue to get smaller and the dart intake will get larger. If this notation is not on the pattern, it is easy to make a line perpendicular to the grainline and adjust from there. You can true up the side seams, but your waistline measurement will remain the same and therefore match your skirt pieces.

Then, all that you need to do is fold to shorten, or cut and add an extra strip of paper to that pattern piece. Just make sure to keep that grainline nice and straight and do the same adjustment to all of your bodice pieces! Well, that will give me the added length I need so that the waistline sits at my actual waist (I usually add anywhere from 5/8" or 3/4" to the torso length). Ironically, I still need to remove extra fabric from my upper and mid back. The adjustment itself ends up looking like a horizontal double ended dart, or something like this.

Basically, you are removing excess fabric from the mid center back, but not changing the armscye area or the length of the bodice side seams, since those have to match up with your bodice front and the sleeve.

First up, draw a line perpendicular to the grainline somewhere just below the arm. I don't need to adjust the armhole or the sleeve, and since those curved edges are more of a bear to modify, I like to steer clear. I also don't want it to be too far down toward the waist, since that is going to be more in the territory of fixing a swayback. My particular issue has pooling fabric that starts just below the shoulder blades.

Next, I fold the pattern along that new line. You can slash through to the seam allowance at the side bodice edge, but I try to keep my cutting of the pattern to a minimum when possible!

Using the folded edge as a guide, I tuck about 3/8" out of the center back bodice, tapering to nothing at the side seam. [If you are using a princess seamed bodice, make sure to lay those extra seamlines together and take that into account as you take a wedge of length out of the pieces.]

You will notice that this distorts the grainline and the center back is no longer on grain. But we will deal with that next.

As you can see, a small wedge was taken out, which can now get pinned in place.
If your back bodice has a dart, you may need to true the upper portion of the dart legs, or even reposition it slightly. I usually find that I can make my adjustment below the armscye and above any dart, but this bodice block I found online has the darts up rather high. But the adjustment still works!

The most important thing to do is reconcile the grainline.

I often cut my bodice back out with extra pattern tissue to play with at center back, but if that is not an option, simply add a strip of paper.

Draw a line from the top of center back to the bottom of center back, recreating a vertical center back seam that will line up with your fabric grainline (and make it possible to cut on the fold, if need be!). It is also a good idea to mark a nice straight grainline as well, or at least cross out the janky one.

And now my pattern piece is ready to be cut out of fabric! These two changes are made to almost all patterns I use and I have found that it works well for me.

Beautifully explained, and your illustrating photos are most helpful.
ReplyDeleteIt's so easy to make the (often) small changes that will allow a garment to fit well -- instead of merely an acceptable fit. Too bad that so many stitchers are afraid to alter a paper pattern.
The printed pattern is merely a guide to achieving a goal. It is not a sacrosanct historical document that must be handled with kid gloves ... unless, of course, you are using a sacrosanct historical pattern. Those should be handled carefully.
Good tutorial.
ReplyDeleteAnd in addition to "long torso" you can be either "short waisted" where the waist is very high or "long waisted" where the waist is very low. Mine is "long torso, short waist" but I must do the opposite of your alteration to compensate for a "rounded back", but that is why we sew isn't it. Very clear illustration of a fairly uncommon alteration.
ReplyDeleteTheresa in Tucson
Good point! I am long in the torso and have a long waist and am also long from waist to lower hip. That took a while to figure out, and is perhaps one of the reasons I don't like wearing pants off the rack!
DeleteThis further elevates all of your creations. You truly put in the extra work necessary to look stylish, particularly with yesteryear's demanding silhouettes.
ReplyDeleteNow please go to an event (the vaccine rates in Marin County are an enviable 64%!), reference a movie or musical, allow your mother to cart you out for a night on the town - ANYTHING; the best rants are born from a kernel of truth.
Tu modificación está muy bien explicada; yo también tengo que modificar bastante la espalda cuando utilizo patrones de revista, pero si utilizo patrones propios diseñados por mí, casi no necesito rectificar. BESICOS.
ReplyDeleteOne of these days I need to make myself a sloper! I keep meaning to, but something else always grabs my attention.
DeleteI’m so thankful to have come across your post today, as I always have extreme pooling of fabric between/below my shoulder blades. Thank you, thank you for this tutorial! As a new sewist (and completely new to garments), I’ve always been of the mind that I was out of luck with getting the right fit. And you’re right here in Marin. Small world! Thanks again! <3
ReplyDeleteThank You! I have been struggling with that weird horizontal excessive crease across the mid-back below my shoulder blades, & was beginning to understand that it was because I stand very straight(Victorian-style "erect posture").Now I know what to do about it!
ReplyDeleteThank you for the tutorial as I also have a long torso but this doesn't adjust for the pulling in the upper back. How is it adjusted there? The arm cycle or upper back. If added to upper back that changes the arm cycle also or adjusts the shoulder?
ReplyDeleteI have one side of my back slightly larger than other side so perhaps i can adjust only the smaller side?
ReplyDeleteWell explained. But how do I make an adjustment to lengthe back pattern with a cut on sleeve. Both front and back pieces are exactly the same
ReplyDeleteThank you for your detail on your adjustments. I have a short torso and flat back. No matter what my weight. It is rare to find any reference to this adjustment. Thanks again.
ReplyDelete