
Bias binding is a wonderful way to finish raw edges - before
I discovered rayon seam binding, it was my favorite way to finish a seam
allowance. It can also be used as a decorative or contrasting edging on a neckline, sleeve, or hemline.
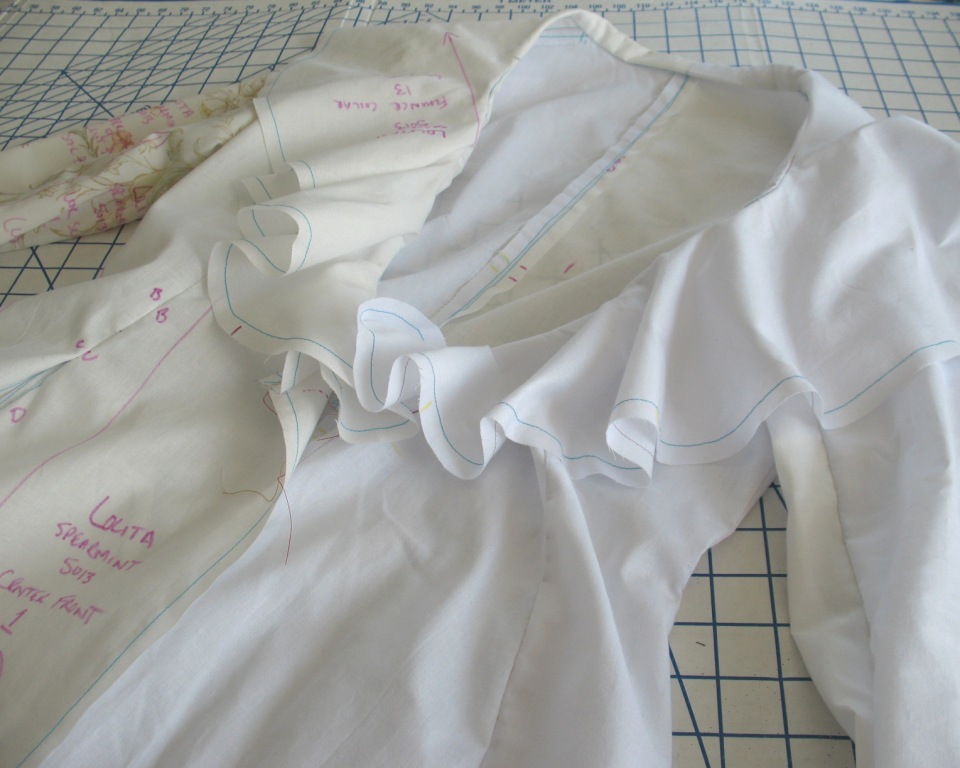
When I discovered Lolita’s Spearmint Coat, I fell in love
with the flounced collar. I immediately started
daydreaming all sorts of fabric possibilities.
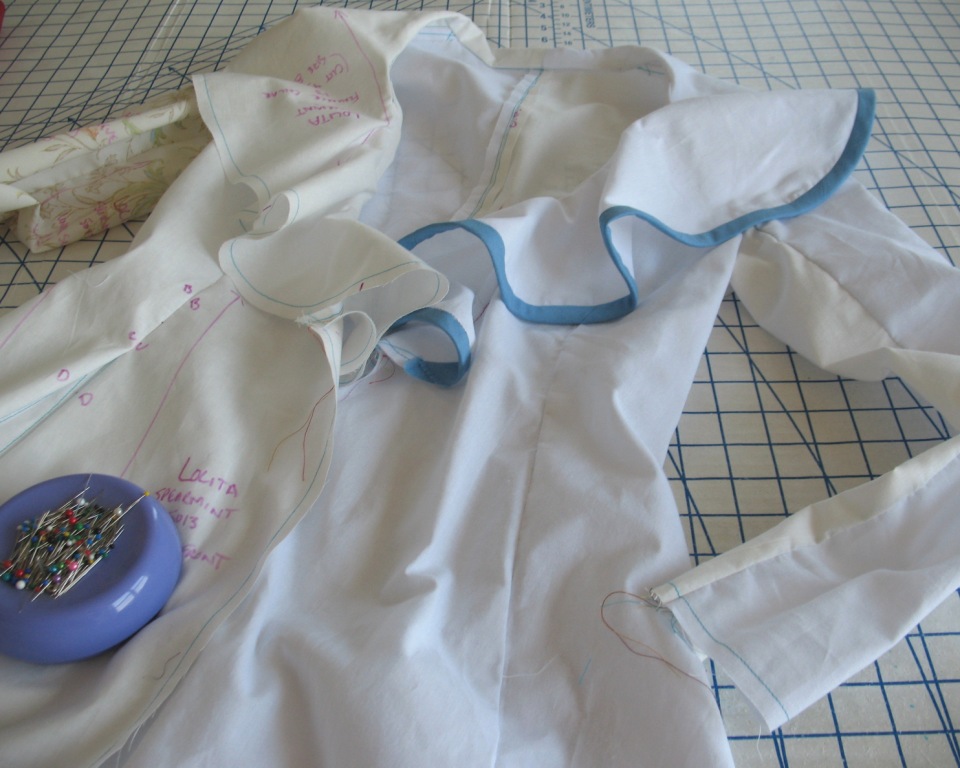
As drafted, the collar is made up of two layers of fashion fabric as
well as a layer of hair canvas/interfacing.
This makes heavy weight fabric choices a bit challenging.
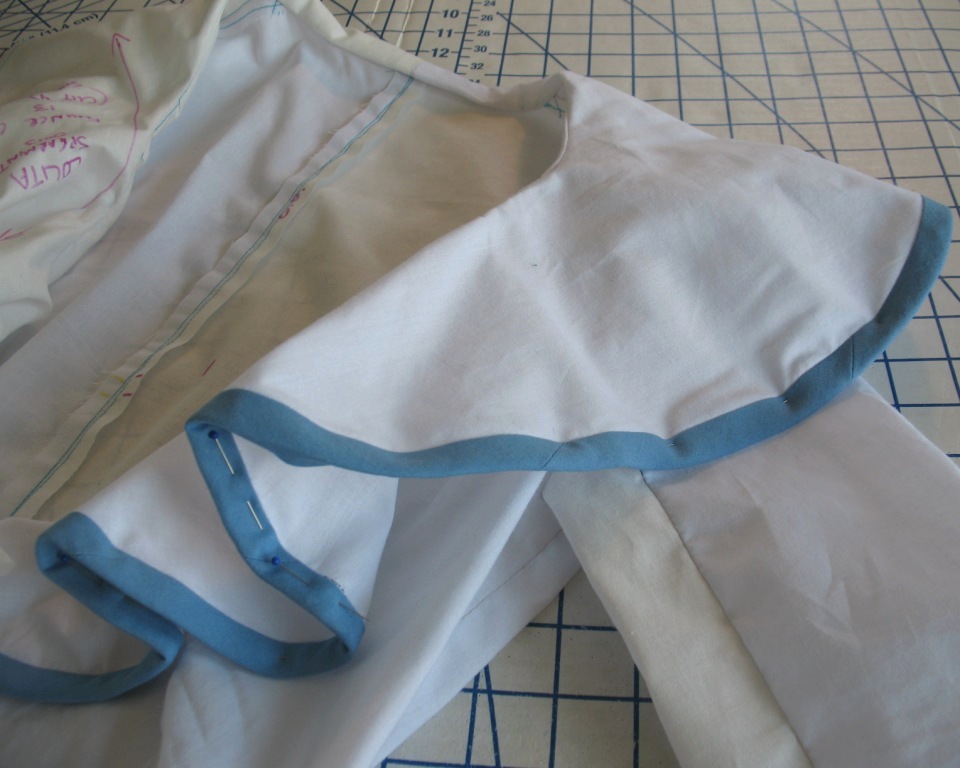
Binding the edge of the flounce is another option. If you use a heavyweight fabric, you could cut one collar layer and use a lightweight fabric as binding. If your mid to heavy weight fabric is double-sided and you want to show it off, cut a single layer and add a binding - the second side will peek through at the front of the flounced collar. Or, for fun, you could add a bit of contrast to the edge – the possibilities are endless! All you will need is a raw edge to apply the binding; if you are using multiple collar layers, edgestitch them together prior to binding them.
[I will be making my Spearmint up in this gorgeous linen from Britex Fabrics. I plan on using two layers of linen to make up the collar, and have not yet decided if I will add an interfacing layer to the mix.]
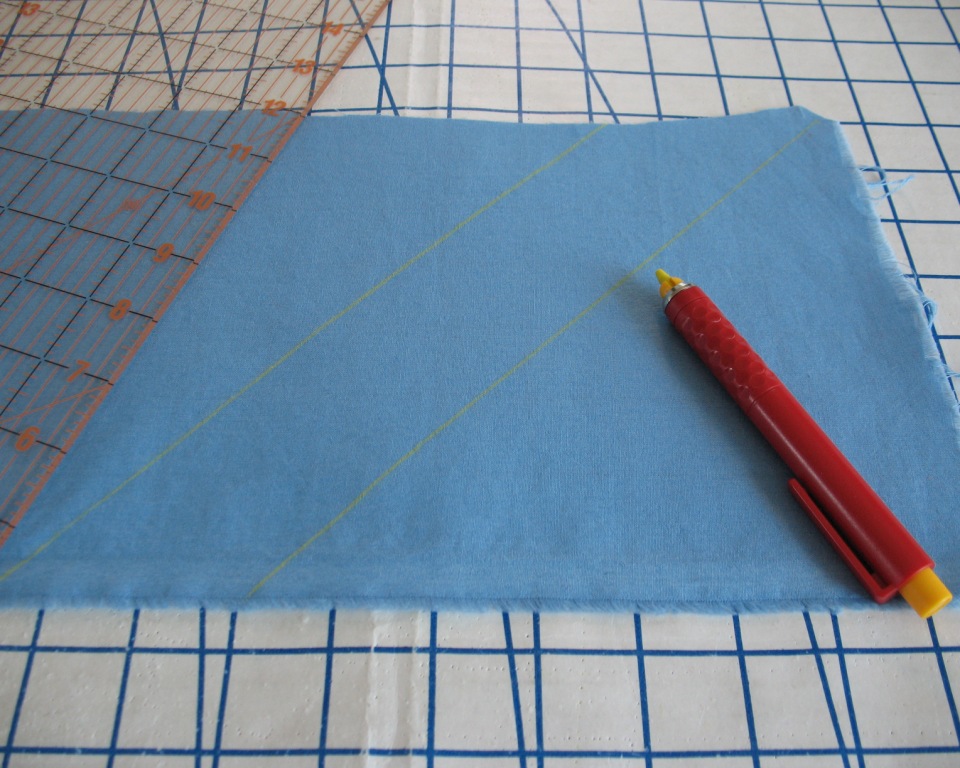
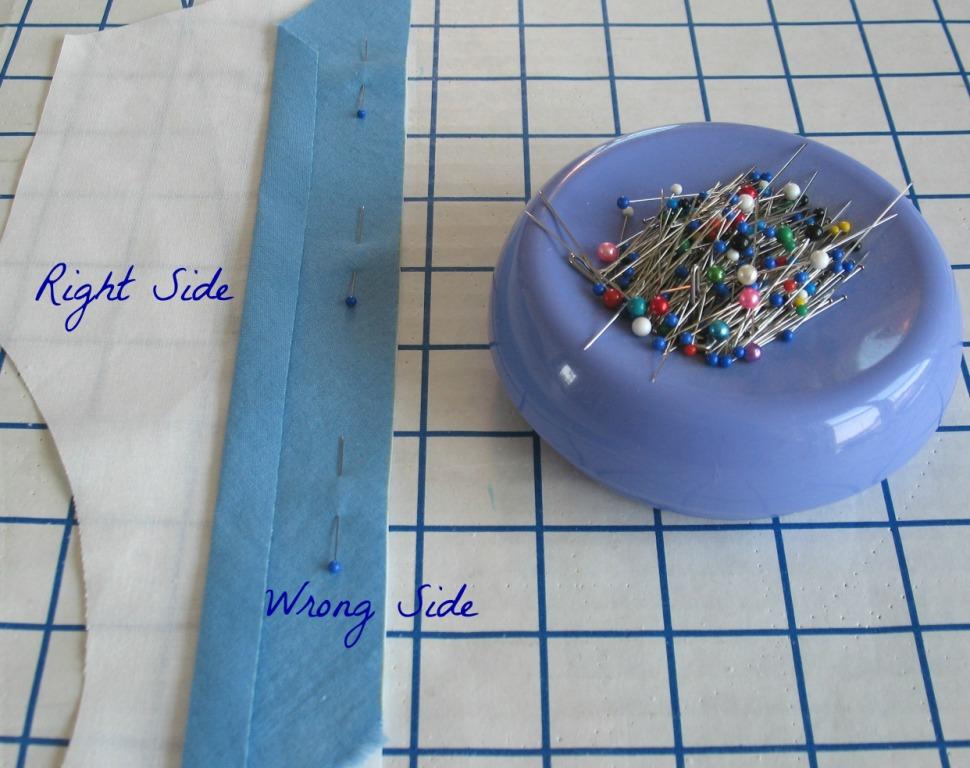
The first step is to cut your bias strips. You can make them as narrow as you like, although I would not recommend the finished width to be more than 3/4" wide on a curved edge to keep the bias from distorting. To make things easy to see, I pulled out a blue cotton remnant to make my bias strips of fabric, and also so you can see how the contrast will look.

If you are using a slippery material, you will want to
choose a marking utensil that has very little drag and will not pull your fabric
off grain.
You will need four times the width of your seam allowance,
plus a bit extra for turn of cloth – if you use a thicker fabric, you will need
to add more than just a bit! It is always a
good idea to play around with the technique using your choice of fabric and bias binding to make
sure you are happy with the outcome. (If your bias is to be applied to a curved edge, make sure to test on one!)
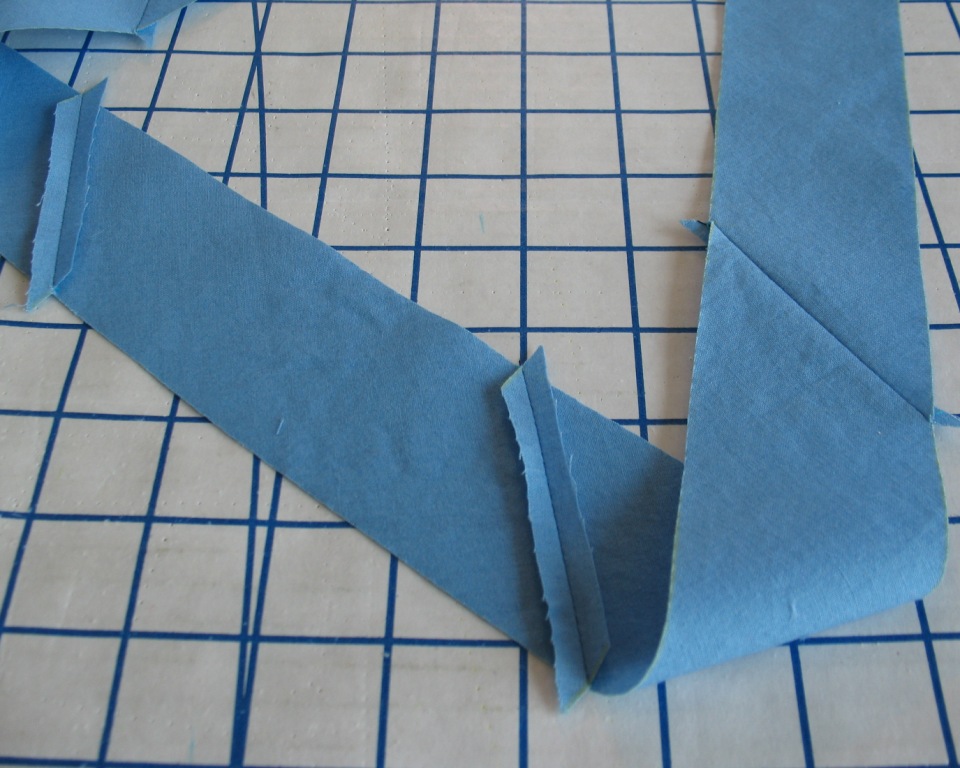
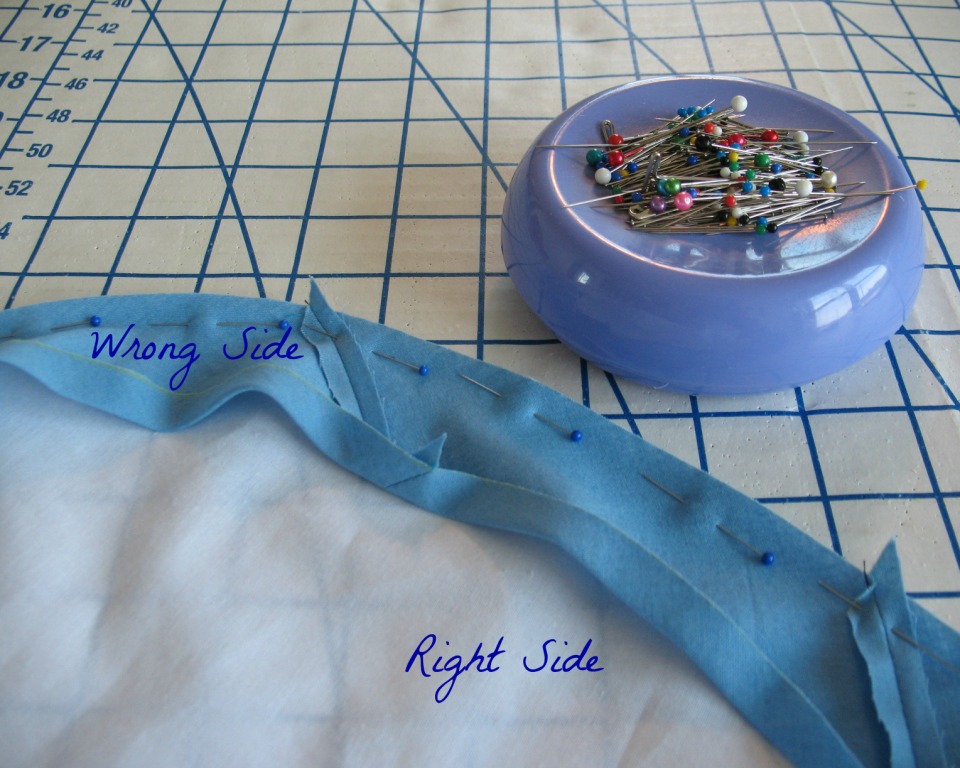
I am using scraps, but it is best to use longer pieces of bias whenever possible to avoid too many joins. You can create a continuous bias strip (this is an excellent tutorial for that), but I like to save fabric, and often end up using the random lengths of bias left from cutting out my pattern pieces.

To do this, mark your bias, cut, and repeat until you have all of your pieces. To stitch them together, you will need to cut all of the edges along the cross grain.

Do yourself a favor, and join them on the cross grain – little triangular tabs will protrude from both sides of the tape if you have matched things up correctly. Press those joins open. Making a blunt perpendicular cut might seem easier, but will create unnecessary bulk and will look clunky when everything is turned and stitched in place.
It is always easier to press your bias strip before applying it to your garment. These strips will have a tendency to stretch, especially if you have a large garment hanging off the edge of your ironing board, pulling at them while you try to press an even allowance. Press under one-quarter of the total width of the binding - if your strips end up a little too narrow, you can cheat some of that width back in by pressing less fabric under.

Pin the strips to the fabric edge, right sides together. Your seam allowance will be equal to the finished width of your bias binding.
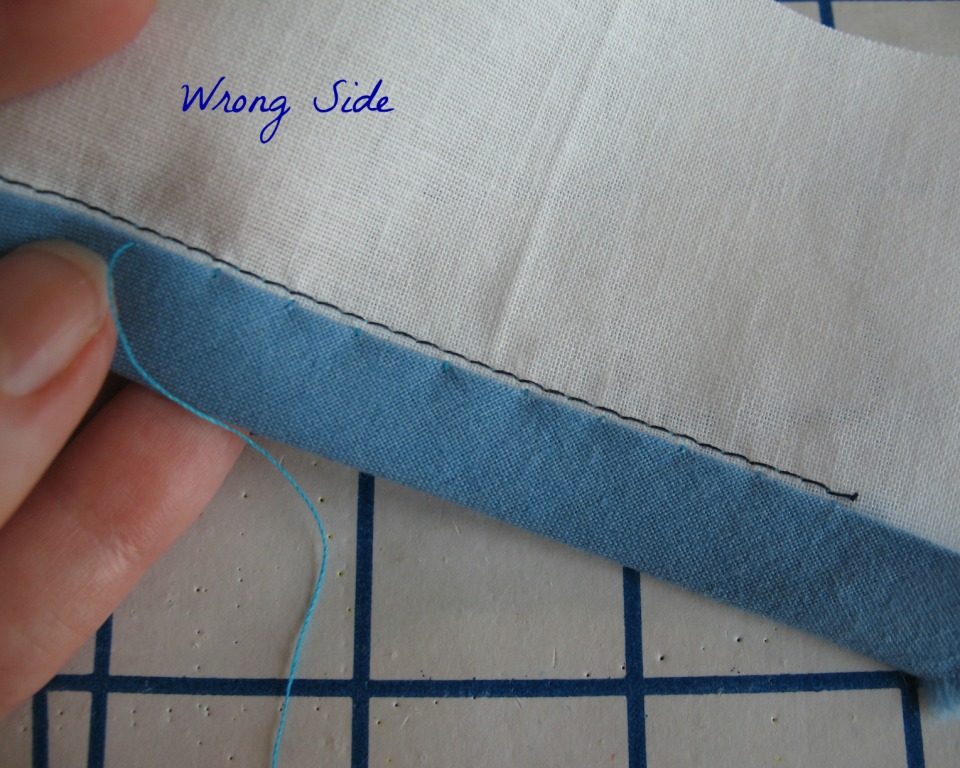
Press the binding towards the raw edge.
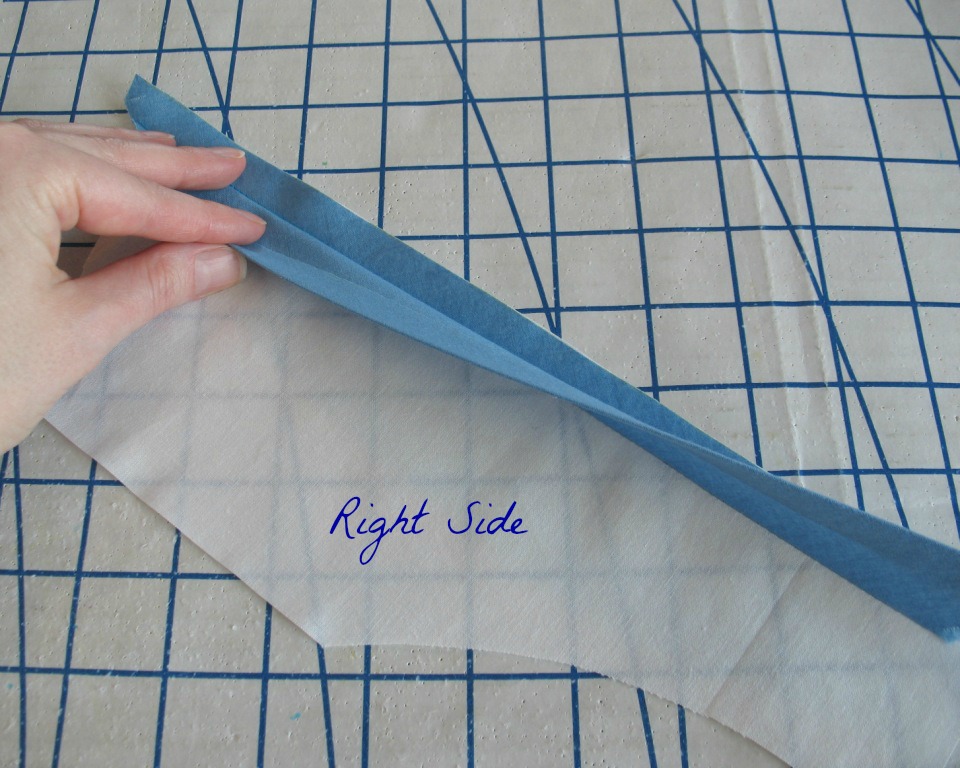

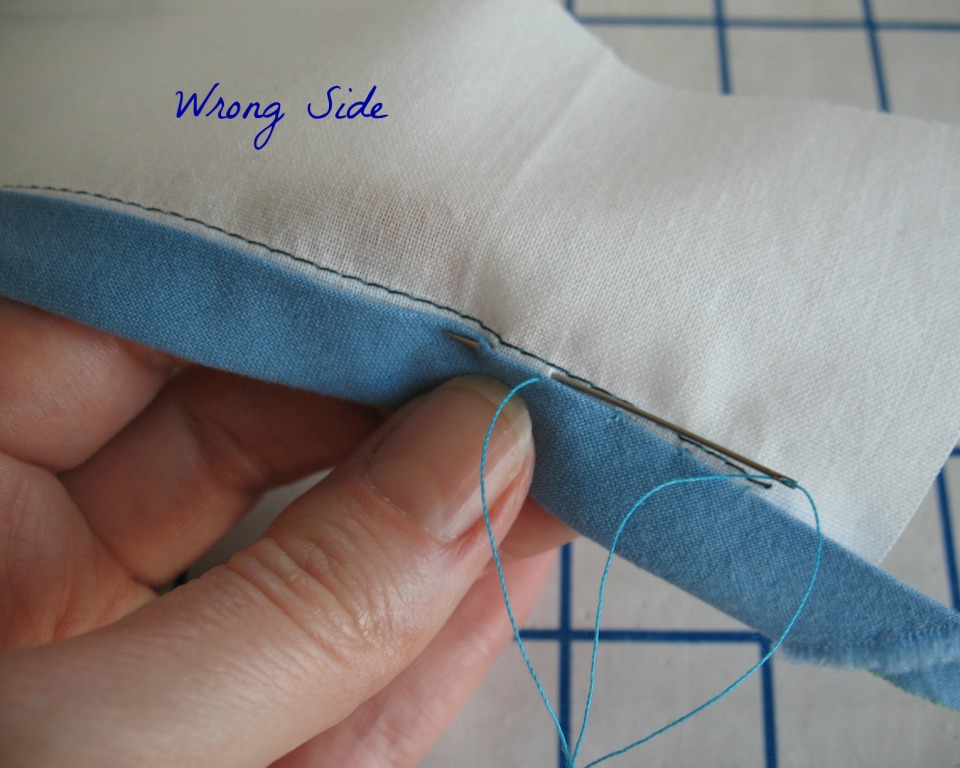
Fold the remaining half of the binding over the raw edge and press into place.
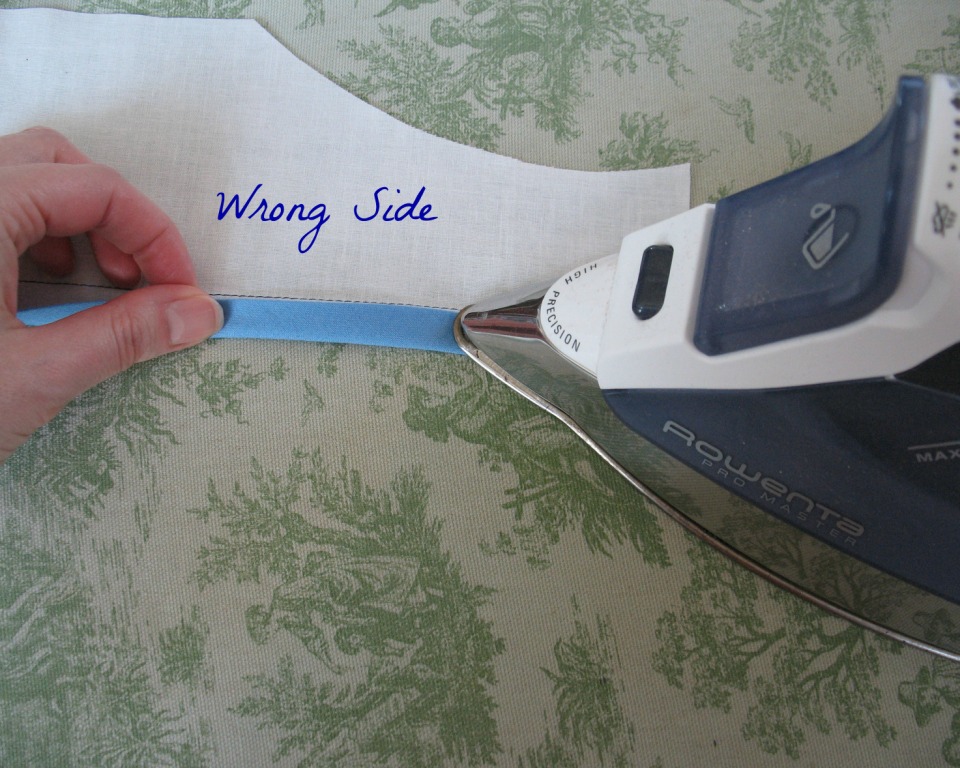
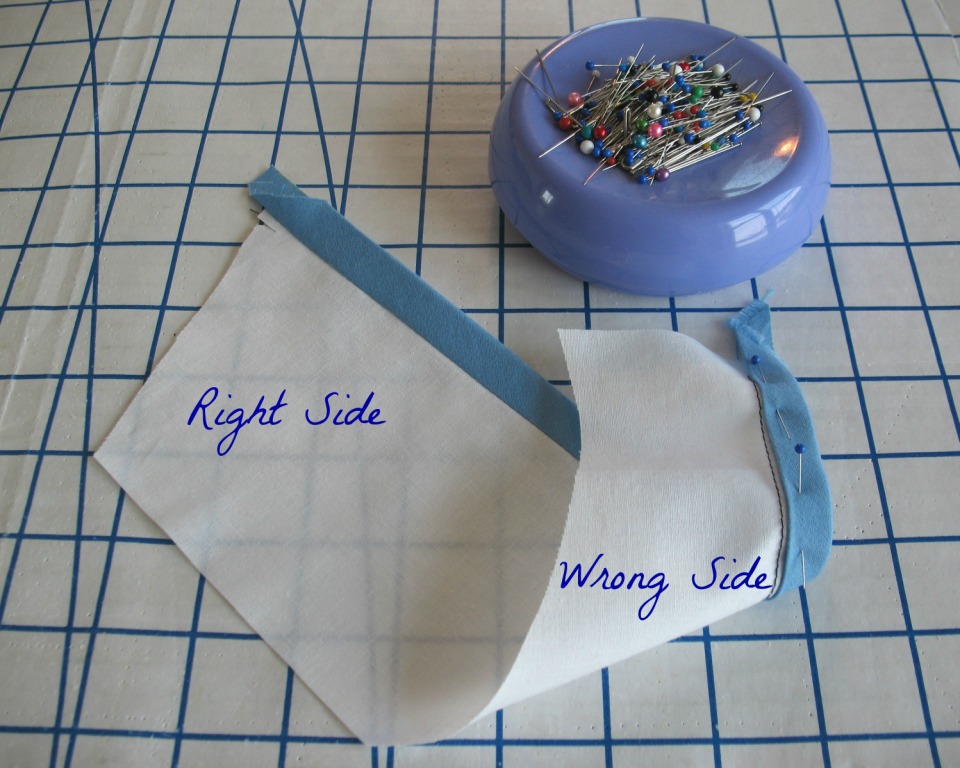
I prefer my finishing to be invisible, so I will be hand stitching the free edge of the binding just inside the machine stitched line. If you prefer, you can use a top-stitch to catch both sides of the binding – just make sure to extend your wrapped bias piece beyond the initial stitching line so your line of top-stitches will catch both sides of the binding.
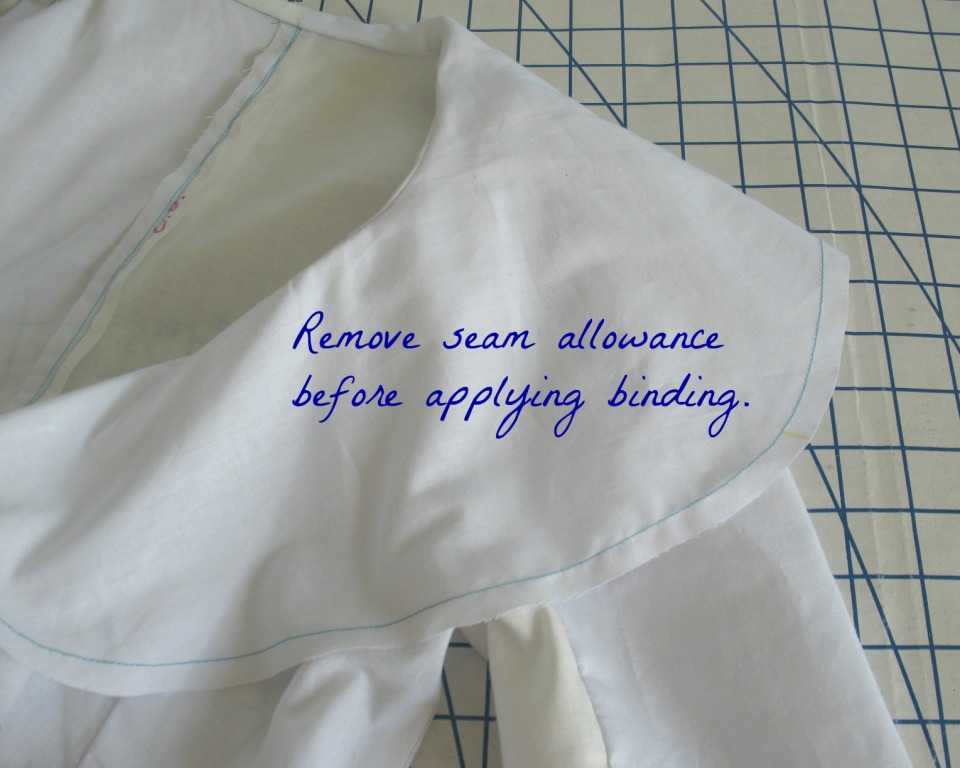
Because this technique will bind the edge of the collar instead of turning it under, we will need to
remove the seam allowance prior to stitching the binding. The same thing would apply to a neckline, sleeve, or hem - remove the seam allowance or you will end up altering the original design.
Make sure to gently stretch the binding around curved edges
to get a nice finish.
For this pattern application, both sides of the collar will be visible in places, so make
sure to be careful with your stitching and thread choices.
Using a bias binding is a slight change, but really opens up the design possibilities!
And if you made it through all of that, you deserve a
reward! Amity has generously offered to
send one lucky winner a copy of this wonderful pattern! Simply leave a comment on this post - if you like, you can tell me what your fabric choice would be for this design. The contest will end Friday evening, 11:59 p.m. PDT.
[The fabric and pattern for
this project were received in exchange for my contributions as a Sewing Indie Month sew-along host and Britex Guest
Blogger]
I know your coat will be lovely. Can't wait to see it finished. OOOOOH! I'd love to have this gorgeous coat pattern. I don't know what fabric I'd use yet.
ReplyDeleteSydney Turner
Right now I am in love with bias binding. It makes things prettier and easier to sew!! You've inspired me to hand stitch next time instead of top stitching my bias - it bothers me if the top stitching looks wobbly, I'm such a perfectionist. >.<
ReplyDeleteI think I'd use a dupioni silk for a special coat, the silk would be warm, but not too warm for spring/summer... but what about making a raincoat from some water resistant jacket weight fabric?
ReplyDeleteThis comment has been removed by the author.
ReplyDeleteEven your muslins are perfections! The photos are real eye candy and you diagram all the important details. I removed the above comment as I do not want to enter the drawing.
ReplyDeleteAlso, I hope you are doing well. You are both majorly talented and appear such a lovely person it was a heartbreaking to learn you are experiencing difficulty. Sending good wishes your way, and thanks for another excellent post!
This comment has been removed by the author.
ReplyDeleteI'm enjoying reading about your progress with this month's muslins. If I hadn't already signed up for two sewalongs at my local sewing boutique, I'd be working on the Anna, which is in my pattern stash.
ReplyDeleteI'd make the Spearamint in royal purple silk dupioni that I plan to purchase when I go to NYC in a few weeks to see the Charles James exhibit as an early birthday present.
Thanks for this very helpful tutorial with all of those clear photos. I'm going to have to give that technique a try.
ReplyDeleteI usually don't make anything that frilly, but I'd dig up some 30s or 40s printed silk or rayon to make the pattern into a housecoat. Wouldn't my family be surprised to see me swanning around in that on a Sunday!
I think it will be lovely in linen or cotton! A nice summer jacket! Thanks for the tutorial
ReplyDeleteI love bias binding. It's one of my go-to techniques. Any jacket I made works have to be BRIGHT to compensate for the grey Northwest weather.
ReplyDeleteI love bias binding, too. A rotary cutter makes it so easy to make.
ReplyDeletePS That thimble that I mentioned at the meetup is by Dritz. It was on the notions wall at Lacis, so it is still available. Mine has lasted for more than 20 years.
Thanks for the info - I will definitely be on the look-out! Hope to see you at the next meetup!
DeleteI think this coat would look lovely in cotton velvet or a light weight brocade. With silk dupioni for the bias binding.
ReplyDeleteI love using bias binding too. The coat would be nice in a cotton for summer.
ReplyDeleteGreat tutoriasl, thank you very much! And the pattern is really cute.
ReplyDeleteI've got some lovely wool that would work brilliantly in that.
ReplyDeleteYour blog has been a joy to follow. I am fascinated with your latest project. I envision this pattern in a lovely linen or cotton.
ReplyDeleteInterface the collar. I've seen enough of these coats to think that linen will need a friend to keep it's girly curvy ripples, rather than stacked pleats around your chest. And a salute to self-made bias binding! More than once, a failed project has been sliced and sewn into satisfying bias trim for future happiness. I trim it, iron it flat (no folds) and roll it up for use later. A crazy print is a nice touch in a cuff, for one. And on this coat, it's going to be a brilliant accent.
ReplyDeleteThanks for all the inspiration! I think I'd like to try this coat in a soft wool to wear on crisp autumn days.
ReplyDeletewhat a lovely collar, can't wait to see the final product!
ReplyDeleteGreat toturial, v clear I instructions! A bias binding edge gives such a smooth finish. I love seeing the process behind your coat! Thanks for hosting this giveaway, I've never made a coat or jacket and would love to try this!
ReplyDeleteOohh, I love that neckline. I would make it in a blue and black Vera Wang brocade that has been languishing in my stash for 2 or 3 years. It would be a nice dressy coat for special occasions.
ReplyDeleteI think I would go with a nice cotton, maybe with a texture, so I can get the most use out of it here in Florida :) Such a pretty design!
ReplyDeleteI would make it in a dark purple wool, perfect for those chilly tailgates this fall!
ReplyDeleteI'm going to try this on a blouse flounce pattern using chiffon instead of turning the raw edge and machine stitching. I know it will be time consuming, but I think it will be pretty.
ReplyDeleteA lightweight wool, but picking a color will be the hardest part!
ReplyDeleteSince I live in Florida, I think I would use flannel, or linen or broadcloth. Our winter isn't long or harsh. I'd use a sold in a bright color with a bold print lining.
ReplyDeletealso have an interesting rose & black jacquard (with a roses pattern) that I think would look lovely for the short coat. I think I would do the facing in the reverse so you could see both sides of the fabric. Perhaps some black piping on the coat edging to make a definitive line between the two sides of the fabric. And a simple black silk lining would do so not to interfere with the pattern of the jacquard. (And to think, I wasn't that excited about this pattern until you made me look at my fabric stash and start thinking about the possibilities!)
ReplyDeleteYou have won me over to rayon seam binding!
ReplyDeleteI could certainly use a new nice, longer coat next winter! I would probably make it out of a light weight wool.